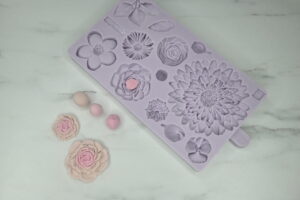
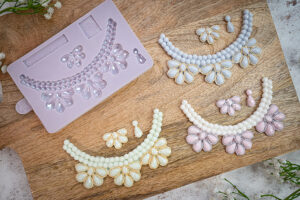
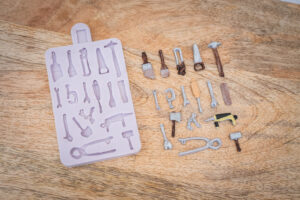
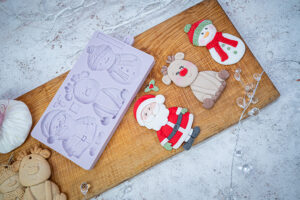
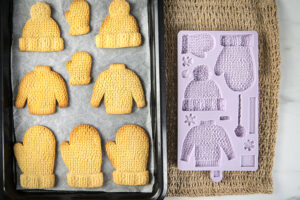
How to Stop Paste from Sticking to Silicone Moulds (And Why Your Paste Matters!)
One of the most common cake decorating frustrations we hear is:
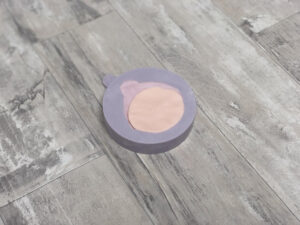
“Why does my sugarpaste stick in the mould?”
The answer isn’t just about technique — it’s mostly about the paste you’re using. The wrong sugarpaste can make decorating a nightmare, but the right one can completely transform your experience.
Let’s break it down and help you avoid the stress once and for all.

The #1 Reason Paste Sticks?
Poor-quality sugarpaste.
Yes — it really can be that simple.
Many pastes on the market are either:
-
Too dry or crumbly (causing elephant skin!)
-
Too soft or sticky
-
Or… let’s be honest… they don’t taste great..

Why Our Paste Makes All the Difference
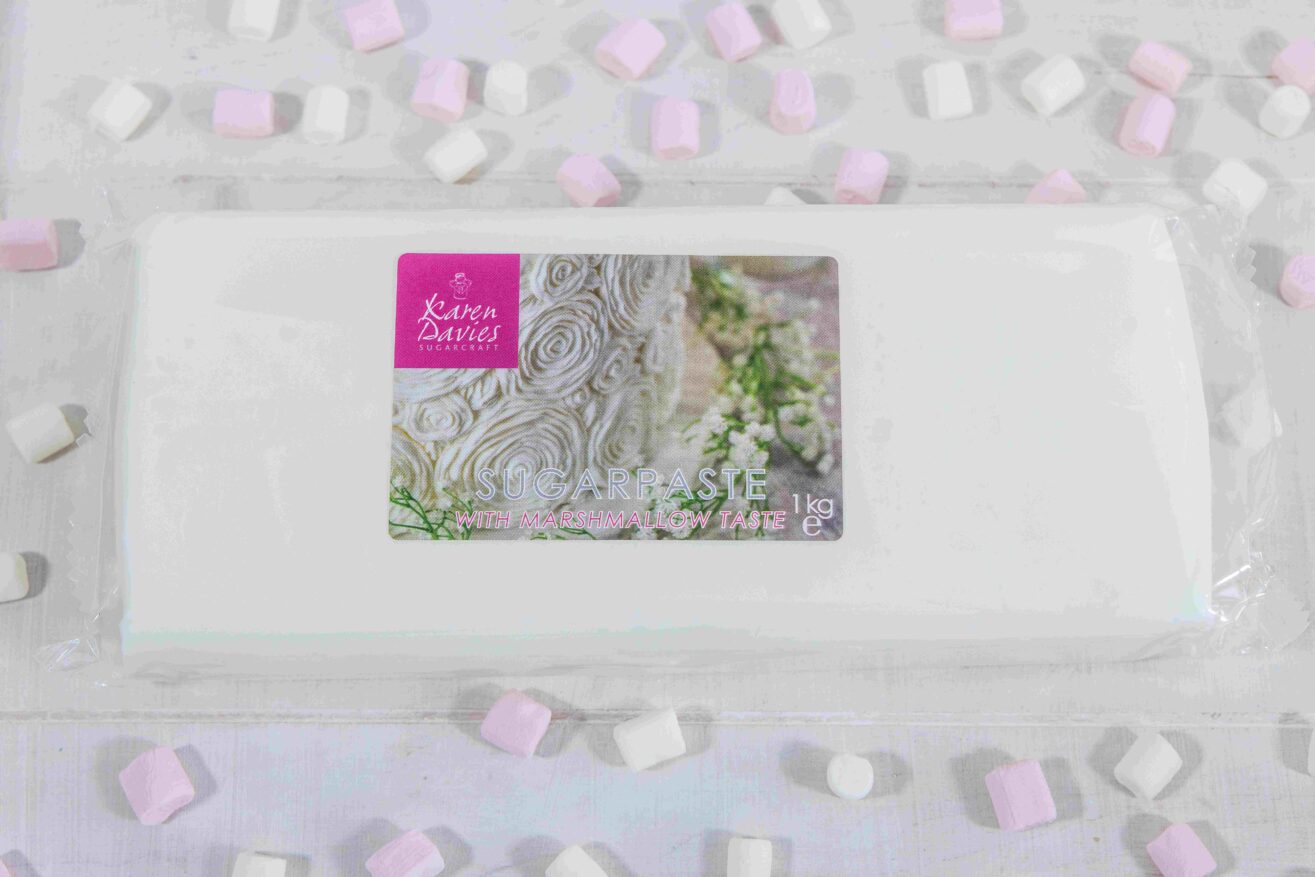
At Karen Davies Sugarcraft, we created our Marshmallow Sugarpaste because nothing else on the market met our high standards for moulding. It’s specifically designed to work flawlessly with our silicone moulds — and here’s why decorators love it:
✅ Pliable and smooth – no cracking, no sticking
✅ Non-sticky texture – ideal for pressing into detailed moulds
✅ Delicious flavour – marshmallow is a customer favourite!
✅ Vegan, gluten-free, lactose-free, milk & egg free
✅ Easy to colour and perfect for beginners
✅ Crack-free coverage when rolling
✅ Long shelf life – even after opening and can be stored and preserved in the freezer.
Whether you’re a hobby baker or professional decorator, this paste does the work for you — all you have to do is press, release and enjoy perfect results every time.
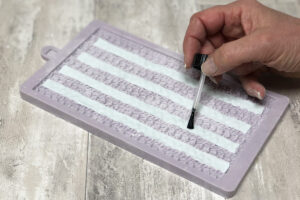
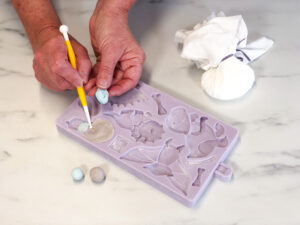
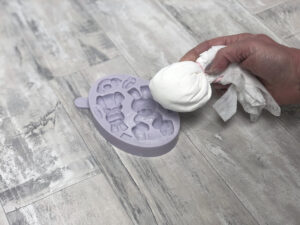
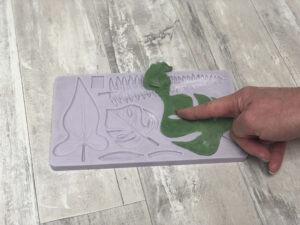
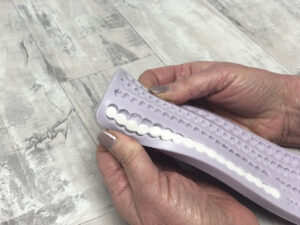
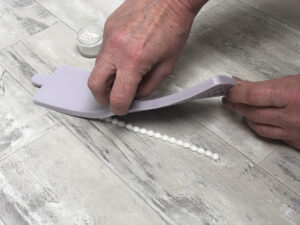
How to Use It Without Sticking
Even with the best paste, there can be some factors that will effect your paste (such as climate) and so here’s a simple process to ensure clean moulding:
-
No need to grease your mould
In fact, this is the worst thing you can do. Simply dust your mould lightly with cornflour and tap out any excess. Knead your paste briefly until soft and press it directly into the mould. -
Press firmly and tear away excess
Use your fingers or a rolling pin for larger moulds – to push the paste in fully and level off the back. Guide any excess to one side and tear away with your thumb (no knives needed!) -
Flex the mould gently to release
Our silicone is designed to release easily. No sticking. No tugging. No tears. -
Use a ball tool for small details
This helps ensure every part is filled without overloading or smudging.
A Word About Cheap Moulds & Tempting Prices
We understand – times are tough, and budget-friendly options seem appealing. But platforms like Temu, Wish, and similar sites often sell poor-quality copies of genuine designs made with substandard materials — and worse, these products may be:
-
Unsafe for food use
-
Unhygienic and poorly manufactured
-
Illegally copied from original designers (including us)
-
Produced under unethical conditions, including forced labour
We stand proudly as a small, family-run UK business with over 15 years of expertise and a commitment to craftsmanship, ethics, and quality. Every mould we produce is hand-sculpted, designed with love, and made to last.
When you support genuine products from authorised retailers, you’re not only investing in better tools — you’re supporting artistry, integrity, and real people behind the brand. Without brands like ours, the copiers won’t have anything to copy and all that will be left are magnet like, lifeless designs.
Karen Says:
“We put our heart into every mould and every batch of paste. We want your decorating experience to be joyful, not frustrating. That’s why we make products that you can trust — and why we encourage decorators to support real craftsmanship.”

Summary: How to Stop Paste From Sticking
✔️ Use Karen Davies Sugarcraft Marshmallow Paste
✔️ Knead your paste until soft — and always dust your mould with cornflour first
✔️ Press firmly, level off, flex and release
✔️ Avoid cheap, counterfeit moulds
✔️ Support genuine suppliers for best results and peace of mind
Shop Sugarpaste Now
Watch Our YouTube Tutorials
Follow Us on Instagram for Daily Cake Inspo
Created with love by a leading UK cake artist & her award-winning daughter. Proudly family-run for over 15 years.
✨ When you use Karen Davies moulds, you’re crafting with the best.
- Published in Blog
How to Get Smooth, Crack-Free Fondant on Cakes (Every Time!)
How to Get Smooth, Crack-Free Fondant on Cakes (Every Time!)
Using Our Best-Selling Karen Davies Sugarcraft Marshmallow Sugarpaste
If you’ve ever struggled with fondant that tears, cracks, or just won’t smooth out properly — you’re not alone. Covering a cake in fondant can be one of the trickiest parts of decorating, especially for beginners.
The good news? With the right technique and the right sugarpaste, it’s absolutely achievable — even enjoyable! At Karen Davies Sugarcraft, we’ve been helping decorators master this for over 15 years, and we’re sharing our expert tips below.
Why Fondant Tears and Cracks
Before we fix the problem, it helps to understand what causes it:
-
The paste is too dry or overworked
-
The fondant is rolled too thin or unevenly
-
It’s not been rested or softened properly before rolling
-
Low-quality sugarpaste that lacks flexibility (we all know the ones).
✨ The Secret Ingredient: Karen Davies Marshmallow Sugarpaste
Our Marshmallow Sugarpaste is a game-changer. Specially developed by Karen Davies herself (one of the UK’s top cake artists), this paste makes it easy for any skill level to get professional-looking results whether it be for covering cakes or working with moulds.
Why It Works:
-
Crack-Free Coverage – Its smooth, pliable texture means it rolls out like a dream and hugs your cake without tearing.
-
Soft & Non-Sticky – You won’t need to over-dust with icing sugar or cornflour, reducing drying and cracking.
-
Little Kneading Required – Just a quick warm-up with your hands and it’s ready to go. Perfect for time-saving! And unlike other brands that arrive hard as a rock and have to be microwaved to even budge.. ours works beautifully straight from the packet.
-
Ideal for Beginners & Pros – Whether you’re new to decorating or a seasoned pro, it helps you achieve flawless finishes easily.
-
Versatile – Not just for covering! It’s also perfect for using with our moulds and for modelling figures.
-
Stunning Taste – The marshmallow flavour is truly something special. You’ll never want another paste again.
Plus: It’s gluten-free, lactose-free, and free from milk and egg. 100% suitable for vegetarians and vegans.
Step-by-Step: Covering Your Cake with Smooth Sugarpaste
1. Prep Your Cake Surface
-
Cover your cake in a smooth layer of buttercream or ganache. Chill it until firm.
-
Lightly mist with water or use a thin coat of piping gel to help the sugarpaste stick.
2. Condition Your Paste
-
Take your Karen Davies Marshmallow Sugarpaste from the pack and give it a gentle knead. Add any edible gel colours at this stage (we love Rainbow Dust or Sugarflair!). A little goes a long way so add small amounts at a time until you achieve your desired colour and you’re left with no streaks. Our sugarpaste softens quickly, so you don’t need to overwork it.
3. Roll It Out
-
Roll the paste evenly to around 4mm thick. Use a non-stick rolling pin and a smooth surface.
-
No need to over-dust — our paste is naturally non-sticky.
4. Lift and Cover
-
Use a rolling pin or your hands to gently lift the sugarpaste and drape it over your cake.
-
Work quickly and gently from the top down, smoothing air out as you go with your hands or smoothers. Always make sure that you secure the top edge first as this is the part that is most prone to tearing.
5. Smooth & Trim
-
Use a cake smoother to gently press and polish the surface.
-
Trim excess with a sharp knife, and finish edges with a final smoothing pass.
- Now you can use a sharp edge smoother – our favourite is Cakes By Carol
✅ You’re done! No tears, no cracks, just a beautiful smooth finish ready to decorate.

Storage & Leftovers
One of the best things about our sugarpaste? It lasts!
-
Keep any unused paste in a sealed polythene bag or airtight tub.
-
It’s freezer-friendly, so you can always have some on hand.
-
Plus it always has a long expiry date!
What Our Customers Say:
“The marshmallow sugarpaste is honestly next-level. It doesn’t crack like others I’ve used and tastes amazing – my customers always ask what it is!”
— Claire, Cake Decorator, Bristol
“Perfect for my moulds and never sticks. I won’t use anything else now.”
— Amy, Home Baker, Leeds
Ready to Transform Your Cakes?
Our Karen Davies Sugarcraft Marshmallow Sugarpaste is available in White and is Marshmallow Flavour – stunning to work with and absolutely delicious.
Treat yourself to a smoother decorating experience — and results you’ll be proud of.
Shop Sugarpaste Now
Watch Our YouTube Tutorials
Follow Us on Instagram for Daily Cake Inspo
Created with love by a leading UK cake artist & her award-winning daughter. Proudly family-run for over 15 years.
✨ When you use Karen Davies moulds, you’re crafting with the best.
- Published in Blog
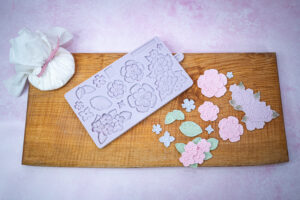
What’s the Best Paste to Use in Moulds – Fondant, Modelling Paste, or Something Else?
Whether you’re creating detailed embellishments, sweet treats, or sculpted cake toppers, getting clean, professional results from your silicone moulds starts with one thing: using the right paste.
But with so many options — fondant, sugarpaste, flower paste, modelling paste, modelling chocolate, even rolled buttercream — it’s easy to feel confused.
So, what’s the best choice?
We’ve tested every option on the market over the past 15+ years, and here’s what you really need to know:
Let’s Clear This Up First: Fondant vs. Sugarpaste
In the UK, the terms fondant and sugarpaste are often used interchangeably. They both refer to a smooth, pliable icing used to cover cakes and model shapes.
In the US, “fondant” usually refers to rolled icing, while “sugarpaste” can be a more general term.
But here’s the key takeaway: not all sugarpaste is made equally, and many off-the-shelf supermarket brands are too sticky, too soft, or too dry for moulds.

Our Recommendation: Karen Davies Sugarcraft Marshmallow Sugarpaste
Developed specifically for use with high-detail silicone moulds, our own-brand paste is a dream to work with:
✅ Smooth and non-sticky
✅ Holds fine details beautifully
✅ Easy to knead and roll
✅ Doesn’t crack or dry too quickly
✅ Ideal for beginners AND pros
✅ Vegan, vegetarian, gluten-, dairy- and egg-free
✅ Can be frozen and reused — excellent value!
It’s also delicious — with our marshmallow flavour being a customer favourite that converts even die-hard fondant-haters.
Flower Paste – Delicate, But Tricky
Flower paste (also known as gum paste) dries extremely hard and is designed for very fine, thin work — think lifelike petals or intricate lace.
However, it can dry too quickly in moulds, often cracking or tearing before you can get it out cleanly. It’s also not very forgiving, making it less ideal for beginners.
Use it only for projects where ultra-fine details are needed — not for general mould work.
Modelling Paste – A Blend of Strength and Flexibility
Modelling paste is usually a blend of fondant and Tylo (CMC) powder. It’s firmer than fondant alone, making it great for figures and 3D work, where you need shapes to hold their form.
It can work in moulds too — but if it’s too firm, you may struggle to press it into fine details. For the best of both worlds, we recommend starting with our sugarpaste and kneading in a pinch of Tylo powder if extra firmness or fast drying is needed.
Mexican Paste – Too Tough for Moulds
Mexican paste is often used for plaques or lettering because it dries firm and flat. But in silicone moulds, it’s usually far too stiff, which means you won’t get clean impressions.
We don’t recommend it for moulding.

Medium Head Mould
Modelling Chocolate – A Dream to Use
Modelling chocolate is made from chocolate and corn syrup, giving it a flexible, smooth texture that’s fantastic for moulds. It holds detail brilliantly and doesn’t dry out as quickly, allowing more working time.
It’s also easy to blend seams and reshape without cracking. The only downside? It can soften in warm hands or humid kitchens.
Still, it’s a top choice for professionals — and we love it!
Rolled Buttercream – New Trend, Gorgeous Taste
Rolled buttercream is a softer, more butter-flavoured alternative to sugarpaste, made with butter, corn syrup and icing sugar. It’s amazing in moulds for those who don’t like fondant, and adds a rich, creamy taste to your decorations.
Want Strength? Add Tylo Powder
If you’re after more structure and quicker drying (especially for figures or standing pieces), knead a small amount of Tylo (CMC) powder into your paste. It transforms our already perfect sugarpaste into a firm, fast-setting modelling paste — without losing its softness or workability.
In Summary – Best Pastes for Silicone Moulds:
| Paste Type | Good for Moulds? | Notes |
|---|---|---|
| Karen Davies Sugarpaste | ✅ Yes | Best overall, designed for detail, easy to use |
| Flower Paste | ⚠️ Sometimes | Tricky, dries fast, better for petals |
| Modelling Paste | ✅ Yes | Great with Tylo already added, firmer finish |
| Mexican Paste | ❌ No | Too stiff, poor definition |
| Modelling Chocolate | ✅ Yes | Holds detail, blends well |
| Rolled Buttercream | ✅ In some cases | Great taste, but requires more effort to make |
Shop Sugarpaste Now
Watch Our YouTube Tutorials
Follow Us on Instagram for Daily Cake Inspo
Created with love by a leading UK cake artist & her award-winning daughter. Proudly family-run for over 15 years.
✨ When you use Karen Davies moulds, you’re crafting with the best.
- Published in Blog
How Do I Mould in Multiple Colours Without It Looking Messy?

How Do I Mould in Multiple Colours Without It Looking Messy?
Your Guide to Clean, Professional Cake Decorations Using Silicone Moulds
If you’ve ever tried moulding in multiple colours only to end up with smudged details or colours that bleed into each other, you’re not alone. This is one of the most common questions we’re asked — and we’re here to show you just how easy it is to get clean, detailed, multi-coloured moulded decorations using our Karen Davies Sugarcraft silicone moulds.
The secret? It’s all about technique, patience, and the right sugarpaste. ✨
First Things First: Use the Right Paste
Start with the best possible base. Our Karen Davies Sugarcraft Marshmallow Sugarpaste is ideal for moulding. It’s:
-
Super smooth and pliable
-
Non-sticky and crack-free
-
Holds detail beautifully
-
Vegan, gluten-free, and lactose-free
-
Delicious and easy to colour
-
Perfect for beginners and professionals
Using a high-quality paste makes a world of difference when working with fine details and layering colours.
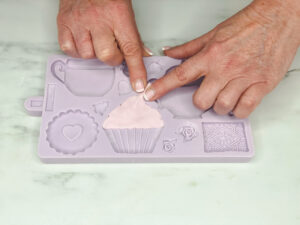
Step-by-Step: Moulding in Multiple Colours
Here’s our simple method for moulding clean, vibrant decorations with no mess or colour bleed:
1. Colour Your Paste First
Use gel food colour and knead it into small amounts of our sugarpaste until you reach your desired shades.
Top Tip: Wear gloves to avoid stained hands, and work on a clean, dry surface.
2. Start with the Deepest Details First
Identify the deepest parts of your mould (like eyes, buttons, sprinkles, etc.).
Use tiny amounts of coloured paste to fill these areas.
-
Use a ball tool or modelling tool to gently press the colour into place
-
Guide any excess over to one edge, then tear away
The goal is to leave colour only where it’s meant to be — no overfilling.
3. Add a Dab of Edible Glue
Once your first colour is in place, brush a tiny bit of edible glue or water over it. This helps the next colour layer stick without shifting or lifting the one beneath.
4. Repeat With Your Next Colour Layers
Work from detail to background. Continue layering colours, using glue sparingly between layers. Build up your design piece by piece.
Don’t rush — take your time and press each colour in gently.
5. Fill the Rest of the Mould
Once the details are done, fill the remaining mould space with your main colour. Press the paste in firmly and ensure the back is smooth.
6. Release and Tidy Up
Turn your mould over and peel back to release your decoration gently and admire your neat colour work! If needed, use a dresden tool to touch up edges.
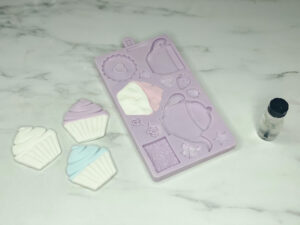
✨ Pro Results, No Painting Required
This technique allows you to mould in vibrant colours with minimal painting afterwards, saving you time and giving you a cleaner finish.
You can use this method with almost all of our silicone moulds.
Karen’s Advice:
“Always start small and build up. You’re best putting in too little paste and adding extra than putting too much in and ending up with a mess. Our moulds are designed to make this process as easy and enjoyable as possible with lots of detail and edges that help you.”
Want to See It in Action?
Visit our YouTube channel for step-by-step tutorials showing this exact method in real time! Follow us on Instagram for daily tips, tricks, and inspiring cake ideas.
Ready to Try?
Explore our full range of moulds and stock up on our best-selling marshmallow sugarpaste — and you’ll be moulding in multiple colours like a pro in no time.
Created with love by a leading UK cake artist & her award-winning daughter. Proudly family-run for over 15 years.
✨ When you use Karen Davies moulds, you’re crafting with the best.
- Published in Blog
Why Does My Buttercream Get Air Bubbles or Look Rough?
How to Get Smooth, Professional Results Every Time
Have you ever spent time whipping up your buttercream only to have it look… bubbly, rough, or full of little holes when you try to decorate with it?
Don’t worry — you’re not alone. This is one of the most common questions we hear from bakers, whether you’re brand new to cake decorating or have been piping for years. Let’s break down why it happens and, most importantly, how to fix it.
What Causes Air Bubbles in Buttercream?
The answer is almost always in how it’s mixed.
When buttercream is over-whipped or whipped on too high a speed, it traps air — think of it like creating a buttercream foam rather than a silky, smooth frosting. That trapped air gets pushed out as you spread or pipe the buttercream, leaving behind:
-
Tiny air pockets
-
Rough or grainy texture
-
Visible bubbles and holes on the surface
The good news? It’s easy to fix with a few simple changes to your technique.
7 Top Tips to Avoid Airy, Rough Buttercream
1. Mix Low and Slow
Always mix your buttercream on a low speed once all ingredients are combined. This helps remove excess air and results in a smoother, denser buttercream — perfect for covering cakes and piping.
2. Use a Paddle Attachment, Not a Whisk
If you’re using a stand mixer, always use the paddle attachment. A whisk introduces more air, which is great for whipped cream — not for smooth buttercream.
3. Scrape Down the Bowl Often
Every few minutes, stop the mixer and scrape down the sides of your bowl. This ensures all your ingredients are incorporated evenly and no extra air is beaten in along the edges.
4. Finish by Hand Mixing
Right before using your buttercream, mix it by hand with a spatula for 1–2 minutes. Press the buttercream against the sides of the bowl to pop any remaining air bubbles. This simple step makes a huge difference in smoothness!
5. Use the Right Butter
Softened, room-temperature butter will whip more evenly and help you avoid curdled or bubbly texture. Don’t use butter that’s too cold or too melted — you want it soft but still solid.
6. Cover and Let It Rest
If you have time, let your finished buttercream rest for 15–30 minutes before using it. Cover it with a lid or cling film to keep it from crusting. The rest time helps air bubbles rise to the top — you can then give it a quick stir before using.
7. Smooth With a Warm Palette Knife
Once the buttercream is on your cake, use a palette knife warmed in hot water and wiped dry to smooth the surface. This melts the top layer just enough to glide over it for a silky finish.
Bonus Tip:
When piping buttercream details, especially with fine nozzles, a bubble can cause your design to “blow out” mid-squeeze. If you’re piping something important (like buttercream flowers), gently stir your piping bag to settle the buttercream before you begin — or press it down well with a scraper to remove pockets of air.
Karen’s Advice:
“Perfecting your buttercream is just as important as choosing the right paste for moulding. It’s all about slowing down and treating your buttercream with care — just like you would with sugarpaste.”
Smooth Buttercream, Beautiful Cakes
Whether you’re topping cupcakes or creating a flawless finish for your fondant-covered cakes, buttercream should be a joy to work with — not a frustration.
By following these tips, you’ll be well on your way to:
✔️ Fewer bubbles
✔️ Silky, professional-looking results
✔️ Less waste and fewer re-dos
✔️ Beautifully smooth foundations for your moulded decorations!
Final Thought
Every cake starts with a smooth base — and with the right buttercream technique and moulds, your cakes will not only look polished, but feel effortless to decorate.
Need help with your next cake? We’re always here to support you.
Team Karen Davies Sugarcraft
Created with love by a leading UK cake artist & her award-winning daughter. Proudly family-run for over 15 years.
✨ When you use Karen Davies moulds, you’re crafting with the best.
- Published in Blog
How Do I Stop Fondant from Sweating or Going Sticky in Humidity?

Top Tips to Keep Your Cakes Smooth, Even When the Weather Isn’t!
Warm weather, humid kitchens, and sticky sugarpaste — it’s every cake decorator’s nightmare. If you’ve ever walked into a room and seen your once-smooth fondant looking wet, shiny, or saggy, you’re not alone.
Humidity and temperature fluctuations can wreak havoc on your beautifully decorated cakes — but with the right products and techniques, you can beat the sweat!
Why Does Fondant Sweat?
Fondant (or sugarpaste) sweats when it’s exposed to sudden changes in temperature, especially when moving from a cool environment (like a fridge) into warm, humid air. The moisture in the air condenses on the surface of the sugarpaste, causing it to become sticky and shiny.
How to Prevent Fondant Sweating
Here’s how to keep your cakes looking flawless in all conditions:
Use a High-Quality Sugarpaste
Your best defence against sticky, sweaty fondant is using one that’s formulated to resist it.
At Karen Davies Sugarcraft, we created our Marshmallow Sugarpaste to be smooth, pliable, and highly stable — even in trickier environments.
✔️ Less prone to sweating
✔️ Holds its shape beautifully
✔️ Crack-free finish
✔️ Tastes amazing (you’ll never want anything else!)
✔️ Suitable for vegans, vegetarians, gluten-free, and dairy-free diets
Using a paste with a balanced formula — not too soft, not too dry — is key to reducing surface moisture.
Avoid Refrigerating Fondant-Covered Cakes (If You Can)
Refrigeration can cause condensation when the cake is removed and exposed to warm air. Instead, if your filling and weather allow, store your finished cake in a cool, air-conditioned room in a cardboard box to protect it from dust and moisture.
If refrigeration is essential (e.g., for dairy-based fillings), then:
-
Remove the cake from the fridge in its box, and let it come to room temperature gradually.
-
Avoid touching the fondant while it sweats — the moisture will evaporate naturally once it adjusts to room temp.
Use a Fan or Dehumidifier
Got a particularly humid kitchen? A small desk fan or dehumidifier in your workspace can help manage moisture levels and dry the surface of your fondant quickly and safely.
Dust with Cornflour or Icing Sugar (Sparingly!)
You can lightly dust your fondant with cornflour or icing sugar to absorb surface moisture — just be careful not to overdo it, as this can leave a chalky residue.
Avoid Sticky Tools and Surfaces
Humidity doesn’t just affect your cakes — it affects your tools too. Make sure your moulds and rolling boards are clean and dry before working. Again, using the right paste is key.
Our Karen Davies Sugarpaste was developed with moulds in mind — it doesn’t cling or sweat in them the way some supermarket brands do.
Bonus Tip: Add Tylo Powder for Figures
If you’re modelling figures or decorations and want them to dry faster and resist humidity, knead a little Tylo (CMC) powder into your paste. This speeds up drying and strengthens your models.
Karen’s Advice:
“Humidity can be one of the most frustrating parts of cake decorating — but it doesn’t have to ruin your work. With the right sugarpaste and a little know-how, you can confidently decorate year-round!”
In Summary: Keep Sweat Away with These Essentials
✔️ Use our humidity-friendly Karen Davies Sugarcraft Sugarpaste
✔️ Avoid refrigerating fondant if possible
✔️ Allow cakes to come to room temperature gradually
✔️ Use fans, dry tools, and store in a cool space
✔️ Add Tylo Powder for quicker-drying figures
Shop Smart. Decorate Confidently.
Choosing the right paste makes all the difference — and our sugarpaste has been developed by one of the UK’s top cake artists with over 15 years of experience in the industry.
✅ Loved by professionals and beginners
✅ Handcrafted and tested in-house
✅ Developed specifically for high detail moulds and cake covering
✅ Available from trusted retailers only
Shop Sugarpaste Now
Watch Our YouTube Tutorials
Follow Us on Instagram for Daily Cake Inspo
Created with love by a leading UK cake artist & her award-winning daughter. Proudly family-run for over 15 years.
✨ When you use Karen Davies moulds, you’re crafting with the best.
- Published in Blog
How to Stack Tiered Cakes Without Them Sinking

How to Stack Tiered Cakes Without Them Sinking
Our Stress-Free Guide to Strong, Stunning Cakes That Hold Their Shape
If you’ve ever attempted a tiered cake and held your breath as you stacked it… you’re not alone!
Stacking cakes can feel daunting — especially when you’ve spent hours crafting perfect decorations and smooth fondant. But with a few simple steps and the right tools, you’ll never have to worry about sinking, sliding, or collapsing tiers again.
At Karen Davies Sugarcraft, we’ve helped thousands of decorators master this technique, and we’re here to walk you through it with confidence.

Why Do Tiered Cakes Sink?
Sinking or collapsing tiers usually happen because:
-
There’s not enough internal support
-
The cake is too soft or warm
-
The dowels used are uneven or unstable
-
It was stacked too early or with too much weight
Let’s fix that!

️ What You’ll Need
-
Cake boards (one under every tier, cut to size)
-
Dowels or supports (plastic is preferable and food-safe)
-
Spirit level (optional, but very helpful!)
-
Cake central dowel (optional for transport)
-
Royal icing or a small amount of buttercream for sticking tiers together
✅ Step-by-Step: Stacking Your Tiered Cake Like a Pro
1. Start With a Solid Foundation
-
Place your bottom tier on a thick drum board (at least 12mm).
-
Make sure the cake is fully chilled and stable before stacking.
2. Insert Your Supports
-
Measure the height of the tier and cut at least 4 dowels to the exact same height.
-
Insert them in a circle (or square) a couple of inches in from the edge of the tier — not right at the edges.
-
These will hold the weight of the next tier — not the cake itself!
TIP: Use a spirit level to check your cake is flat before stacking the next tier.
3. Stack the Next Tier
-
Each cake tier should be on its own cake board the same size as the cake.
-
Add a little buttercream or royal icing to the top of the bottom tier to help secure the next one.
-
Carefully lower the next cake tier into place. Make sure it’s centered.
4. Repeat for Additional Tiers
-
Continue doweling and stacking one tier at a time.
-
Always keep your cake chilled between steps if you’re working in a warm environment.
5. Use a Central Dowel (Optional for Transport)
-
Once all tiers are stacked, you can drive a central dowel through all the tiers and boards for extra stability — especially useful if transporting the cake.

Top Tips to Prevent Sinking
✔️ Use firm cake types for stacked cakes (avoid soft sponges or overly moist fillings unless well supported)
✔️ Always let cakes rest/chill overnight before stacking
✔️ Don’t stack warm cakes – ever!
✔️ Use quality sugarpaste like our Karen Davies Marshmallow Sugarpaste to ensure smooth, strong finishes
✔️ Keep your cake level at every stage — uneven layers = leaning or tipping
✔️ Transport cakes in a cool vehicle, on a flat surface

Karen’s Bonus Tip:
“Think of cake stacking like building a house – if your structure isn’t strong, the whole thing can collapse. With a bit of planning and a few dowels, you can build tiered cakes that travel miles without a wobble!”
Finish With Confidence
Once stacked, decorate your cake with confidence using our handcrafted Karen Davies silicone moulds — from elegant borders to themed toppers. Our paste is perfect for creating lightweight yet detailed decorations that won’t weigh down your tiers.
Want More Cake Decorating Help?
Watch our video tutorials on YouTube
Follow us on Instagram for daily tips and inspiration
Shop our full range of moulds & sugarpaste for perfect results every time
Created with love by a leading UK cake artist & her award-winning daughter. Proudly family-run for over 15 years.
✨ When you use Karen Davies moulds, you’re crafting with the best.
- Published in Blog
Can I use one mould for multiple materials (e.g., chocolate, clay, soap)?
Can I Use One Mould for Multiple Materials (Chocolate, Clay, Soap)?
We get asked this all the time — and it’s such an important question!
The short answer is: yes, you can use silicone moulds for a wide range of materials… but you shouldn’t use the same mould for food and non-food purposes. Let’s break down why, and how to get the best out of your moulds.
Food Use vs Non-Food Use: Why It Matters
At Karen Davies Sugarcraft, all of our silicone moulds are made from top-quality, food-safe, FDA-approved silicone, designed specifically for use with:
-
Sugarpaste
-
Chocolate
-
Flower paste
-
Modelling paste
-
Fondant
-
Isomalt
-
Marzipan
-
Rolled Buttercream and more!
Once you use a mould for non-edible materials like:
-
Air-dry clay
-
Resin
-
Soap
-
Wax
-
Polymer clay
…you must no longer use it for food. Why? Because even after thorough cleaning, microscopic residues of non-food-safe materials can remain behind — and they could transfer into your edible creations.
The golden rule: One mould, one purpose.
Our Top Tip:
Keep a separate set of moulds for non-edible projects. You can even label or colour-code them to avoid mixing them up!
Our Moulds Are Loved by All Kinds of Creators!
Because our designs are hand-sculpted, modern and incredibly detailed, they’re popular with:
-
Cake decorators looking for fast, flawless texture and detail
-
Chocolate artists wanting unique shapes that release perfectly
-
Soap makers creating boutique bars with fun or elegant textures
-
Crafters working with air-dry clay or resin for jewellery, ornaments or decorations
Why Choose Karen Davies Silicone Moulds?
✨ Superior quality: Strong, flexible and easy-release
✨ Unique handcrafted designs: All modelled by hand by one of the UK’s top cake artists and her award winning daughter
✨ Incredible detail: Reproduce textures and shapes beautifully across many mediums
✨ Long lasting: Designed for professional use again and again
✨ Made in the UK: From a small family business with 15+ years’ experience
✨ Outstanding versatility: Use with edible AND craft materials (just keep them separate!)

️ The Perfect Excuse to Treat Yourself…
Already used one of our moulds for clay or soap? That’s the perfect reason to grab another just for your bakes! Our full collection includes:
-
Confectionery moulds for sweet treats
-
Afternoon Tea moulds with biscuits, strawberries and more
-
Florals, lace, textures, borders — everything you need to decorate with ease
Summary: Can One Mould Do It All?
✔️ Yes, our moulds work with chocolate, clay, soap and more
But no — don’t use the same mould for both edible and non-edible materials
Instead, grab a few favourites and dedicate them to each craft
Your cakes (and your craft room!) will thank you ️
Want help picking the best moulds for your projects? Drop us a message — we’re always happy to help.
Created with love by a leading UK cake artist & her award-winning daughter. Proudly family-run for over 15 years.
✨ When you use Karen Davies moulds, you’re crafting with the best.
- Published in Blog
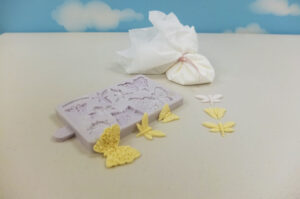
Tutorial – Wild Meadow Wedding Cake
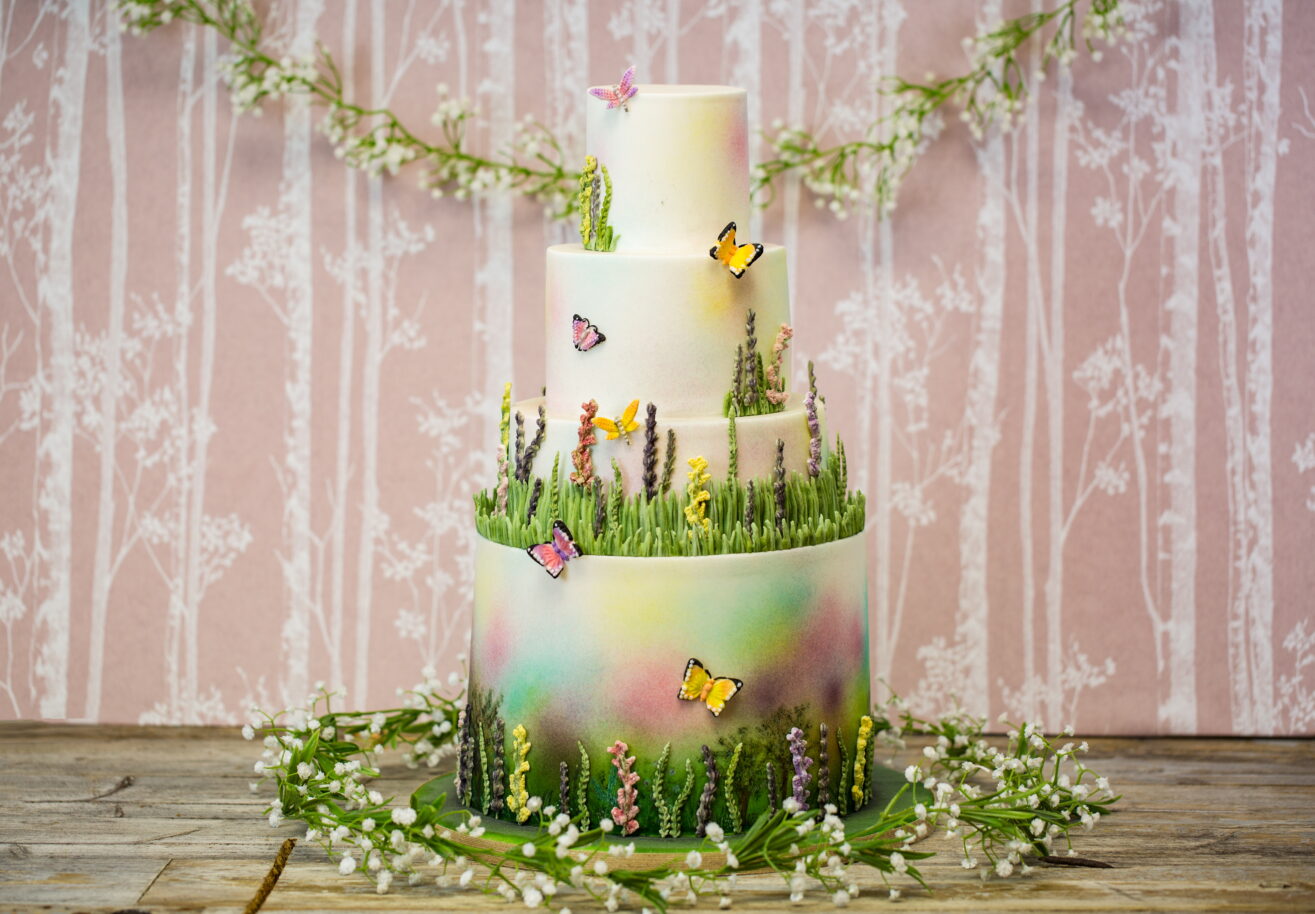
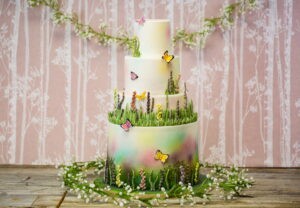
Wild Meadow Wedding Cake
Alice Kayley – Karen Davies Sugarcraft
A cake that oozes the sense of Spring/Summer days. Botanical and bright, the perfect centerpiece for any wedding or celebration
Equipment
2 x 10” round cakes 4” deep
8” cake 3” deep
6” cake 4” deep
4” cake 4” deep
14” cake drum
8”, 6” and 4” cake cards
1kg Karen Davies sugarpaste or a modelling paste
Karen Davies Wild Meadow mould
Karen Davies Brush Embroidery Butterflies mould or Butterfly & insect mould
Dresden tool
Isopropyl alcohol
Paintbrushes and dusting brushes
Airbrush and colours (optional – powder colours and brushes can be used), green, pink, blue, purple
Powder colours, dark green, brown, lavender, yellow, pink, blue, black, white, orange, silver.
Sugarflair Spruce green paste colour
Cornflour dusting pouch
Angled palette knife

Instructions
Cake Preparation
Stack the 10” cakes. Place the cakes on board and cards. Cover all cakes with sugarpaste. Dowel the cakes and trim level with each cake top. Roll out a long strip of sugarpaste and use to cover the edge of the cake board.
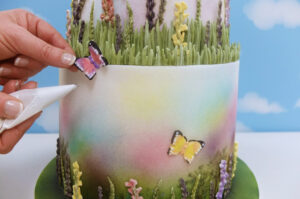
Use the airbrush to colour the cake and board. Build the green colour up gradually from the board and up the cake. Fade the green on the side of the cake. Add a little blue, pink and lilac further up the side of the bottom tier and to each of the other tiers.
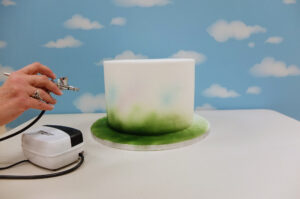
If you do not have an airbrush – mix isopropyl alcohol with powder green colour. Paint the board dark green and the lower edge of the cake. Fade the colour out against the cake – do not have a sharp finish line. Brush powder colours into the dusting brushes on kitchen paper so there is no loose powder. Add patches of colour to every cake.
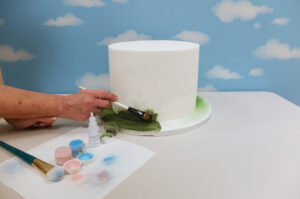
Mix brown powder colour with isopropyl alcohol and paint trees.
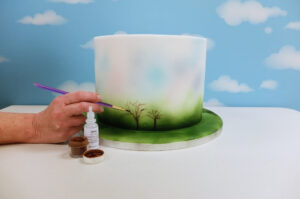
Paint leaves by just ‘dotting’ on the colour randomly over branches. Start with dark green, then a lighter green and finally a small touch of colour. 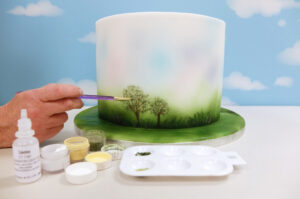
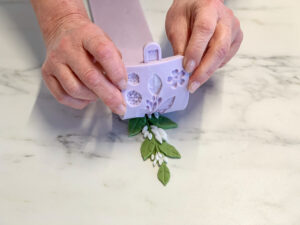
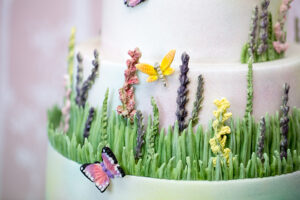
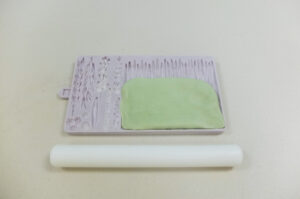
Colour some KD sugarpaste or a modeling paste green. Dust the wild meadow mould with cornflour. Mould the fern leaves and flower stems in green and white paste.
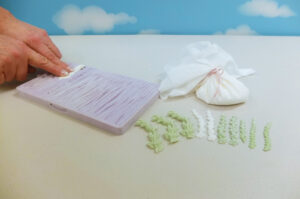
Curve slightly and leave to dry.
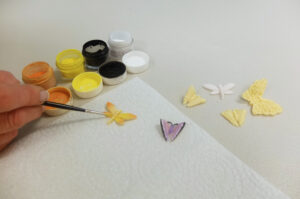
Brush powder colour onto leaves and flowers for a soft effect. Paint flowers for stronger colour. Small white highlights can be painted on also.
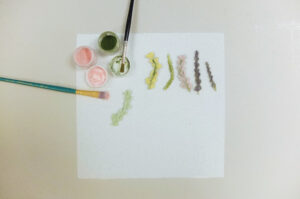
Mould butterflies and dragonflies in white and yellow paste. Allow some to dry flat on your work surface and others to dry folded against the mould.
Brush powder colours on to the butterlies and dragonflies for soft shading. Paint for the stronger colouring.
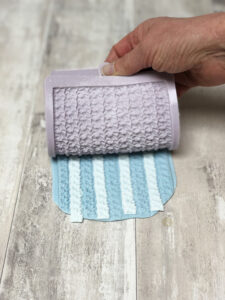
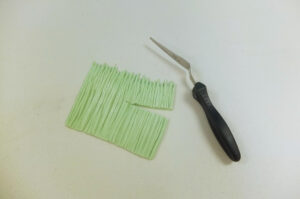
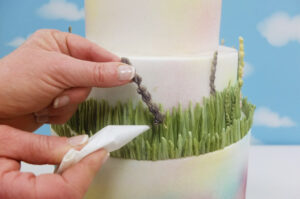
Dust the wild meadow mould with cornflour. Roll the green paste out a little before placing on to the grass so it is not too thick. Roll from the bottom of the grass to the top. Trim the excess paste at the top of the mould with an angled palette knife, your thumb, or remove from the mould and use scissors.
Trim the grass to approximately 1.5inches.
Brush powder green colour between the blades of grass then a little across the top. A touch of white can be added to highlight.
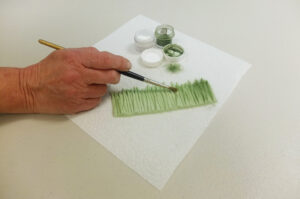
Repeat the moulded grass pieces trimming to approximately half an inch.

Colour royal icing green and place in a piping bag. Use the royal icing to attach the taller grass to the side of the 8inch tier and the short grass to the top edge of the 10inch. Add flowers and leaves.
Attach flowers around the bottom tier.
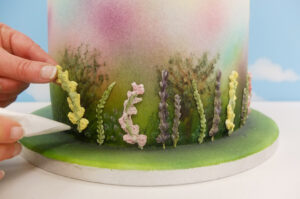
Attach the butterflies and dragonflies at random working their way up the cake. Small groups of flowers and grass can be added to the top two tiers.
- Published in Blog
Silicone Mould Masterclass

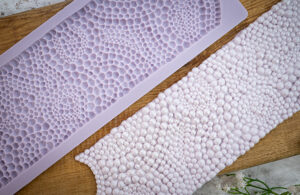
- Material: Ensure your silicone mould is made from food-grade silicone for edible creations or high-quality silicone for crafting projects. Be careful where you purchase moulds from as there are many counterfeit moulds out there which use inferior quality silicone that may not be food safe, will rip or tear and do not have the release quality required to give you optimum results.
- Design: Select a mould that complements your project. Moulds come in various shapes and sizes, from intricate patterns to detailed figures.
2. Preparing the Mould:
- Cleaning: Wash the silicone mould with mild soap and water before the first use. Our silicone moulds are dishwasher friendly too! (Not moulds on the market are).
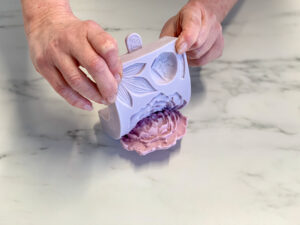
- Dust with Cornflour: ALWAYS dust your mould with cornflour. Use a cornflour pouch and pat it all over the mould. Tap out any excess before moulding. Do not use trex (white vegetable fat). The reason is that when you release the paste from the mould, you might want to add colours by brushing on or painting with powders. The grease will prevent you from doing this.
- Have tylose (cmc) powder to hand: Tylose(cmc) powder can be added to your sugarpaste / fondant to ensure that it will work with the moulds. The general rule is approximately 1 tsp of tylo kneaded into 250g of sugarpaste. The quantity can vary slightly depending on the brand of paste that you use. You need to bear in mind that the paste will also firm up further the few hours after the tylo is kneaded into it. Karen Davies Sugarcraft own brand sugarpaste works straight from the packet with no need to add tylo.
3. Using the Mould:
- Materials: Prepare your chosen material (chocolate, fondant, resin, etc.) according to the product instructions.
- Filling the Mould: Pour or press the material into the mould carefully, making sure to reach all the details. Make sure you fill the cavity so as your material is flat against the back of the mould.
- Leveling: Scrape excess material from the top of the mould using your fingers if using sugarpaste/ cookie dough/ clay or a spatula or knife if using a liquid substance to create a smooth surface.
- Make sure your fingers aren’t sticky: When moulding a thin piece of sugarpaste, you should also dust the back of the paste with cornflour to prevent it sticking to your fingers and lifting out of the mould too soon.
4. Setting or Baking:
- Setting Time: Sugarpaste and certain clays can be released immediately. Simply turn your mould over and peel back. Chocolate and other liquid materials will need to be left to set. Cookie dough should be released onto a lined baking tray ready for baking.
- Baking: If using for baking, follow the recommended temperature and time guidelines, such as our no-spread cookie recipe.
5. Releasing:
- Waiting Period: Ensure your creation has fully set or cooled before attempting to demould. Sugarpaste, rolled buttercream, certain clays and cookie dough can be released immediately.
- Peeling Away: Gently peel back the edges of the mould to release your creation. Flex the mould to help release the edges if necessary.
6. Cleaning and Storage:
- Cleaning Up: Wash the mould with mild soap and water. Some silicone moulds are dishwasher safe (including ours.. yippee!)
- Storage: Store the mould in a cool, dry place.
7. Tips for Success:
- Temperature Awareness: Be mindful of temperature requirements for both the material and the mould. In warmer weather
- Experiment: Don’t hesitate to experiment with colors, layers, and techniques to enhance your creations.
- Patience: Allow ample time for setting or cooling if using a liquid material to avoid damaging your masterpiece during release.
8. Advanced Techniques:
- Layering: Create multi-layered designs by building colours! When using sugarpaste use a small bone tool or ball tool to help you press different coloured pastes into different crevices.
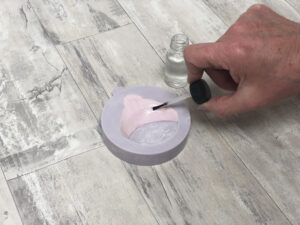
- Painting/Decorating: After releasing, enhance your creations with additional colors or decorations. We always use edible powder colours to dust our creations and we add rejuvenator spirit to turn our powders into paints when a stronger colour is needed.

9. Safety:
- Material Safety: If using for food, ensure that the silicone mould is food-grade and has no harmful additives. Counterfeits like those on Amazon, Shein, Alibaba and Temu are more than often not food safe. If the mould seems like an absolute bargain.. there’s a reason for it. Poor quality silicone can also rip or tear.
- Ventilation: For projects involving fumes (e.g., resin casting), work in a well-ventilated area.
Remember to always follow the specific instructions provided by the manufacturer of your silicone mould and the material you are using. Happy creating!
- Published in Blog, Uncategorized
- 1
- 2