
Tutorial – Cute Christmas Teddies
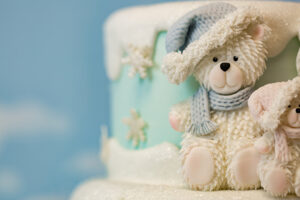
Cute Christmas Teddies
These cute little teddies are the perfect addition to any Christmas cake or why not make the teddy in biscuit dough and then dress in sugar paste?
Ideal for tree decorations, gifts, table places or if you just fancy a festive treat!
They can also be used for baby showers, birthdays and christenings.
Use our cookie recipes for perfect cookies that won’t spread!
Watch our quick tutorial video and then follow the instructions below!
For our favourite cookie recipes click here >>> ‘How to mould and bake perfect cookies’
Equipment
Karen Davies Large Teddy Mould
Karen Davies Knitted Piece Mould
And/Or Karen Davies Crochet Piece Mould
Karen Davies Sugarcraft Sugar Paste in Vanilla or Marshmallow
Cornflour
Small Rolling Pin
Rainbow Dust White, Black and Pink powder colour
Selection of small paintbrushes
Edible glue
Sieve
Cutting Wheel
Palette Knife
Dresden Tool
Instructions
- Dust your Large Teddy Mould with cornflour. Turn over and tap out any excess.
- Press sugarpaste firmly into your mould. Make sure your paste isn’t going over any edges and is flat at the back. Guide any excess over to one side with your fingers and tear away.
- Turn your mould over and peel back. Your teddy should drop out easily.
- Dust his feet, ears and cheeks with Pink powder colour.
- Mould a piece of paste in your Knitted Piece Mould. Turn over and peel back to release.
- Use a cutting wheel to cut a straight edge across your piece.
- Take a palette knife and carefully cut under each of his arms so as they can lift up away from his body.
- Place your knitted paste on top to fit like a jumper. Mark where you will need to cut the neck and sides.
- Use a cutting wheel to follow these guide lines and cut out the jumper.
- Attach to your bear using edible glue.
- You can now use any left over knitted paste to make sleeves. Make the first by placing the paste over an arm and marking where you need to trim. Trim the piece with a cutting wheel to create a sleeve. You can now use this as a template to create your second sleeve. Attach to the tops of the arms using edible glue.
- Glue the arms back down to the sides of the bear.
- Use a dresden tool to neaten any joins.
- Mould another piece of paste in your Knitted Piece Mould.
- Hold against the teddies head to mark where you need to trim to make a hat. You want to create a curved triangle shape.
- Attach on one side of the teddies head. Bend the edges of the hat underneath. You can create crease lines where the hat bends with your dresden tool.
- Mix Black powder colour with ispropyl alcohol and paint the eyes and nose. You can also add eyelashes if you wish.
- Your bear can be left plain or you can use small tweezer scissors to snip the paste to make the bear look fluffy. You do this by laying your scissors flat on the surface of the bear and snipping.
- You can add trims to the jumper by moulding the trim on the Knitted Piece Mould.
- Roll a ball of paste and attach to the end of the hat as a bobble. Roll a sausage of paste and attach around the bottom of the hat to create a trim. Brush both with edible glue.
- Push paste through a sieve. Make sure your fingers aren’t sticky by dusting them with a little cornflour. Press your paste through the sieve to create ‘fluff’.
- Use a palette knife to scrape the fluff away from the sieve and attach to the trim and bobble.


You must be logged in to post a comment.