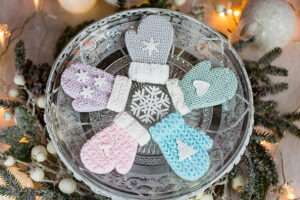
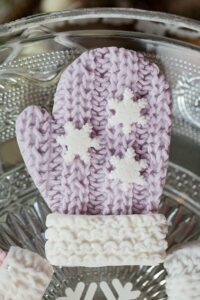
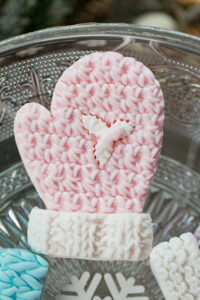
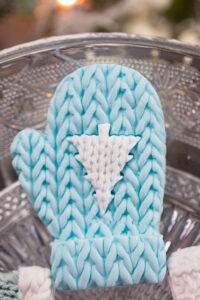
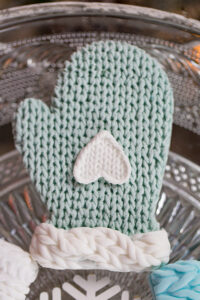
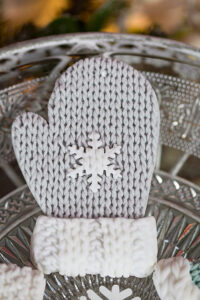
Tutorial – Winter Mitten Cookies
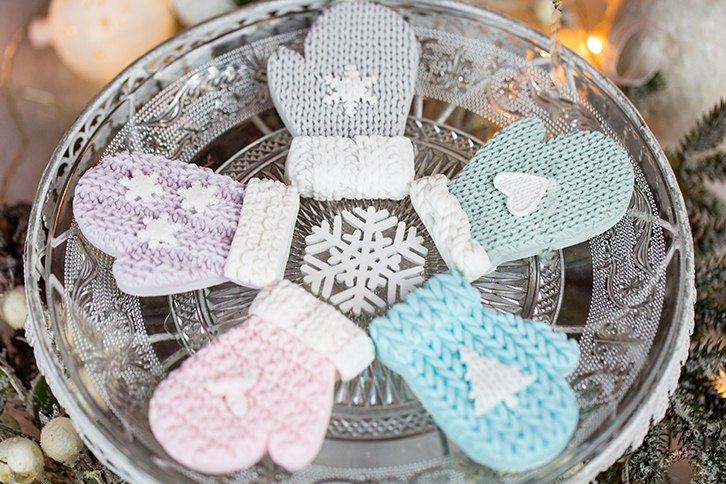
Winter Mitten Cookies
Keep your cakes and bakes warm this Winter with this fun winter mitten tutorial.
Make mittens using our cookie recipes and our range of knit and crochet moulds!
Watch our quick tutorial video and then follow the instructions below!
For our favourite cookie recipes click here >>> ‘How to mould and bake perfect cookies’
Equipment
Either..
Karen Davies Sugarcraft Chunky Rib Mould
Karen Davies Sugarcraft Knitted Piece Mould
Karen Davies Sugarcraft Crochet Piece Mould
Karen Davies Sugarcraft Chunky Knit Mould
And/Or..
Karen Davies Sugarcraft Rustic Cable Knit Mould
Corn Flour
Edible Glue
Various cutters such as Holly and Trees could also be used.
Instructions
- Make your cookie dough following the instructions in our ‘How to mould and bake perfect cookies’ post.
- Roll out your cookie dough until it’s 1cm thick and use your mitten cutter to cut out as many mittens as you would like.
- Place on a baking tray and bake.
- Once your mittens are baked, allow them to cool. You can either wait until your cookies are completely cool and then follow the steps below, attaching your decorations to your cookie as you go. Or you can create the decorations in advance and then simply attach on top of your cookies once the cookies have cooled.
- Colour your sugarpaste using food colouring. They look beautiful in either pastel or festive colours. We always use either Rainbow Dust or Sugar Flair food colouring.
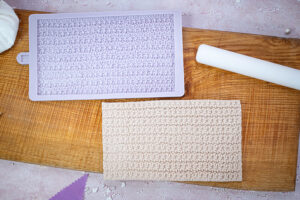
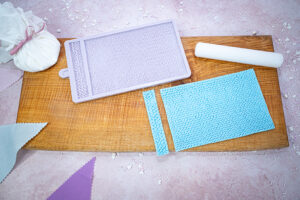
- Start by dusting your knit/crochet effect mould with cornflour and tapping out any excess.
- Roughly roll out your sugarpaste on your work surface before placing into your mould. Start by using your fingers to press and secure your paste into one edge of the mould. Take a rolling pin and begin to roll from the edge that you have just secured. Roll firmly into the mould until you can begin to see the pattern through the back of your sugarpaste.
- Tear away any excess either with your fingers or with a palette knife before turning your mould over and peeling back. Your sugarpaste should drop out easily.
- Use your mitten cookie cutter to cut out a mitten from your moulded sugarpaste. To create a pair, simply turn your paste over so as the plain side is facing up and cut. Before cutting – make sure that the knitted pattern is running in the correct way – down or across your mitten. Place to one side.
- Now you can mould accessories for your hat using various cutters such as holly and trees or you can mould accessories from our moulds such as Rustic Cable Knit Mould, Sugar Snowflakes Mould, Baby Buttons Mould, Buttons Mould, Flower Buttons Mould.
- Mould a trim for your mittens using one of our various knit/crochet effect moulds. In the video above we have used the trim from our Knitted Piece Mould. Measure it against the cuff of your mitten before trimming to size with a cutting wheel and attaching with edible glue. You can also make trims using any of the other moulds in our knit & crochet range.
Let it snow, let it snow, let it snow!
- Published in Blog
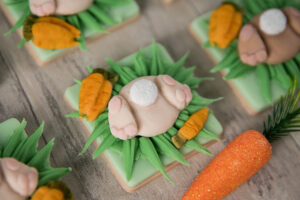
Tutorial – Bunny bottom Easter cookies
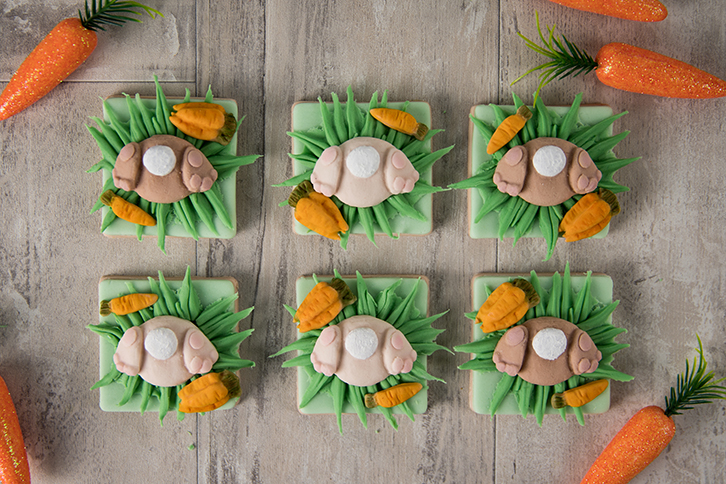
These cute bunny bottom cookies make perfect Easter treats. Give as gifts or make with the kids this Easter! Can also be used as decorations on cupcakes and cakes.
Equipment
Karen Davies Sugarcraft Wild Meadow Mould
Karen Davies Sugarcraft Easter Bunny Mould
Small Rolling Pin
Palette Knife
Edibles
44m square cookies baked using our cookie recipe >> see here <<
Icing Sugar
Apricot Jam
Cornflour
Sugar Flair Spruce Green food colouring
Rainbow Dust Chestnut food colouring
Rainbow Dust Tangerine food colouring
Rainbow Dust powder colours – Autumn Green, Pumpkin Pie, Snow Drift, Pink Candy.
Edible Glue
1. First you will need to bake some delicious cookies using our cookie recipe! See the recipe here!
Make your dough, roll it out on to your work surface and cut cookies using a 44mm square cookie cutter. Place on a lined baking tray and bake!
2. Allow your cookies to cool on a cooling rack.
3. Colour some Karen Davies Sugarpaste pale green using Sugar Flair Spruce Green food colouring. Dust your work surface with icing sugar and roll your sugarpaste out thinly on your work surface. Use your cookie cutter to cut enough squares to cover all of your cookies.
4. Once your cookies have fully cooled, spread a thin layer of apricot jam on the top surface and attach a green square on each.
5. Colour some paste a darker Green colour using the Spruce Green food colouring.
6. Dust your Wild Meadow Mould with cornflour and tap out any excess.
7. Roll a sausage of paste wide enough to fill the top quarter of the grass on the mould and long enough to fill the width. Place on top of your mould a quarter of the way down from the top of the grass.
8. Use your fingers to press the bottom edge of your paste into the mould. This will help hold your paste in place whilst you roll the rest up to the top of the grass.
9. Use a small rolling pin to roll your paste up the top of the grass. You may need to dust the back of your paste with cornflour to stop it from sticking to your rolling pin.
10. Make sure your paste is rolled thinly and flat against the mould. Carefully cut away any excess using a palette knife. If you cut over the top of the grass you will see that your paste will remain in the grass strands and any excess will come away.
11. Turn your mould over and peel back to release your grass. You can now dust it with Autumn Green Powder colour.
12. Cut your grass into thirds. This will give you enough grass for three cookies. Repeat steps 7-11 until you have enough grass for all of your cookies.
13. Take a strip of moulded grass and bend it into a circle shape so that both ends meet. Attach the ends together with edible glue.
14. Attach the circles of grass to the centre of each cookie using edible glue. Don’t worry if there is a hole in the middle as your bunny bottom will hide it!
15. Colour different shades of pale Brown sugarpaste using Chestnut Brown food colouring.
16. Dust your Easter Bunny Mould with cornflour and tap out any excess.
17. Roll a small ball of sugarpaste and firmly press into the bunny bottom on your mould. Guide any excess paste to one edge and tear off with your thumb. Make sure your paste is flat at the back before turning your mould over peeling back to release.
18. Dust the pads on the bunnies feet using Rose powder colour.
19. Dust the tails with White powder colour.
20. Attach your bunny bottoms on top of the grass on your cookies using edible glue.
21. Colour some sugarpaste using Tangerine food colouring. Mould carrots from the Easter Bunny Mould. Dust the leaves with Autumn Green powder colour and the carrots with Pumpkin Pie powder colour before attaching to your cookies.
- Published in Blog
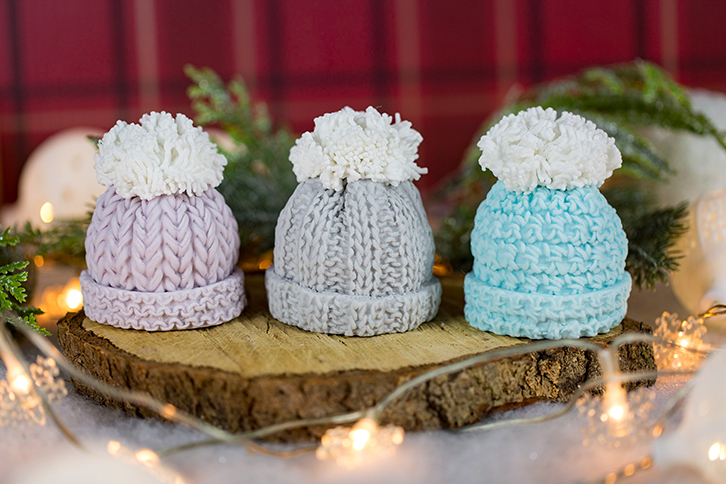
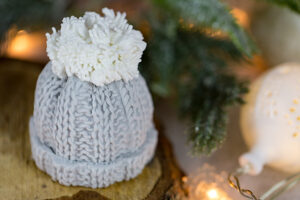
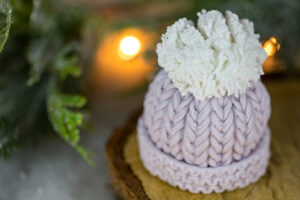
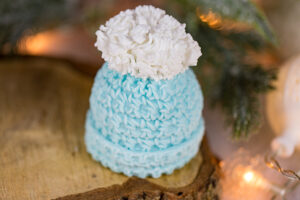
Tutorial – Bobble Hat Cookies
Bobble Hat Cookies
Keep your cakes and bakes warm this Winter with this fun bobble hat tutorial.
Make cute bobble hats using our cookie recipes and our range of knit and crochet moulds!
Watch our quick tutorial video and then follow the instructions below!

For our favourite cookie recipes click here >>> ‘How to mould and bake perfect cookies’
Equipment
Either..
Karen Davies Sugarcraft Chunky Rib Mould
Karen Davies Sugarcraft Knitted Piece Mould
Karen Davies Sugarcraft Crochet Piece Mould
Karen Davies Sugarcraft Chunky Knit Mould
And/Or..
Karen Davies Sugarcraft Rustic Cable Knit Mould
Corn Flour
Edible Glue
Sieve
Cutting Wheel or Pizza Wheel
Palette Knife
Instructions
- Make your cookie dough following the instructions in our ‘How to mould and bake perfect cookies’ post.
- Roll out your cookie dough until it’s 1cm thick and use your bobble hat cutter to cut out as many hats as you would like.
- Place on a baking tray and bake.
- Once your hats are baked, allow them to cool. You can either wait until your cookies are completely cool and then follow the steps below, attaching your decorations to your cookie as you go. Or you can create the decorations in advance and then simply attach on top of your cookies once the cookies have cooled.
- Colour your sugarpaste using food colouring. They look beautiful in either pastel or festive colours. We always use either Rainbow Dust or Sugar Flair food colouring.
- Start by dusting your knit/crochet effect mould with cornflour and tapping out any excess.
- Roughly roll out your sugarpaste on your work surface before placing into your mould. Start by using your fingers to press and secure your paste into one edge of the mould. Take a rolling pin and begin to roll from the edge that you have just secured. Roll firmly into the mould until you can begin to see the pattern through the back of your sugarpaste.
- Tear away any excess either with your fingers or with a palette knife before turning your mould over and peeling back. Your sugarpaste should drop out easily.
- Use your bobble hat cookie cutter to cut out a hat from your moulded sugarpaste. Before cutting – make sure that the knitted pattern is running in the correct way – down or across your hat. Place to one side.
- Mould a trim for your hat using one of our various knit/crochet effect moulds. In the video above we have used our Rustic Cable Knit Mould. Measure it against the bottom of your hat before trimming to size with a cutting wheel and attaching with edible glue.
- Roll a small ball of sugarpaste and attach and gently flatten to the bobble on your hat. Lightly cover with edilble glue.
- Soften sugarpaste using Trex (white vegetable fat). Roll into balls and press through a sieve to create the fluffy bobble texture. Press through until it is the desired length. Use a palette knife to gently scrape the ‘fluff’ off and take over to your bobble. Attach to your bobble. Repeat the process 4-5 times until the bobble is covered.
- Now you can mould accessories for your hat from our various moulds such as Rustic Cable Knit Mould, Baby Buttons Mould, Buttons Mould, Flower Buttons Mould.
Oh, the weather outside is frightful!

- Published in Blog
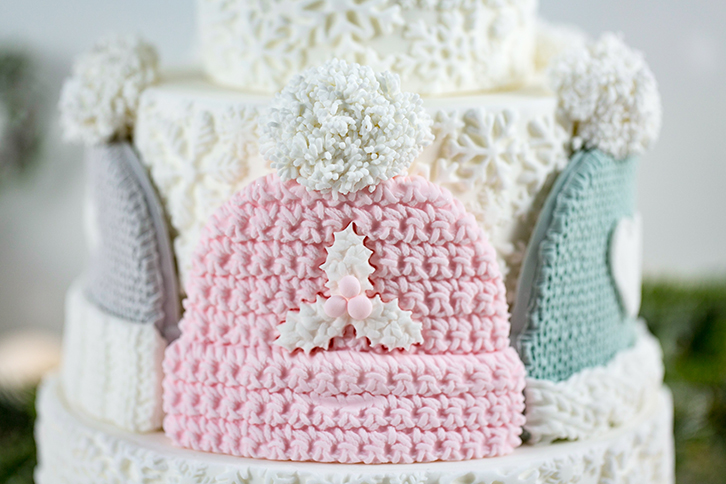
Tutorial – Mini Bobble Hat Cakes
How To Make Mini Bobble Hat Cakes!
Keep your cakes and bakes warm this Winter with this fun bobble hat tutorial.
Make cute bobble hats using muffins or cupcakes and our range of knit and crochet moulds!
Watch our quick tutorial video and then follow the instructions below!
Equipment
Either..
Karen Davies Sugarcraft Chunky Rib Mould
Karen Davies Sugarcraft Knitted Piece Mould
Karen Davies Sugarcraft Crochet Piece Mould
And/Or..
Karen Davies Sugarcraft Chunky Knit Mould
Corn Flour
Blue, Grey, Lilac or Pink Food Colouring
Buttercream/Apricot/Chocolate
Sieve
Knife
Edible Glue
Instructions
- Colour some sugarpaste in your chosen colour.
- Take your muffin or cupcake and turn it upside down so as it’s widest point is at the bottom. Trim bottom flat if necessary. Crumb coat in buttercream (jam, chocolate etc can also be used if preffered).
- Dust which ever knit/crochet effect mould you have chosen with cornflour. Tap out any excess.
- Roll out your sugarpaste roughly on your work surface and then place on top of your mould. Use your fingers to secure the bottom edge and one side edge down into the mould before using a rolling pin to firmly roll your paste into the mould. You should start to be able to see the pattern through the back of your paste.
- Turn your mould over and peel back, your paste should peel easily out of the mould.
- If your paste looks like it’s going to be too big for your cake you can trim a little excess off. But there’s no need to be precise, you’d rather leave yourself with more to work with than too little!
- Wrap your paste around your cake and use your fingers to gently press and gather any excess together at the top. Use a sharp knife to carefully cut away any excess.
- Use a Dresden Tool to help disguise any joins. Don’t worry too much about the top as your bobble will cover it.
- Brush the top of your hat with edible glue and then roll a ball of white sugarpaste and attach on top.
- Brush around the base of your hat with edible glue and mould a trim from either the same mould or from another one of our knitted effect moulds. Trim to size before attaching using a knife or cutting wheel.
- Use a Dresden Tool to help push the paste around the top edge of your trim right up against your bobble hat so as there are no gaps showing.
- Brush the white ball on top of your hat with edible glue. Soften white sugarpaste with some Trex (white vegetable fat). Take a sieve and press a ball of sugarpaste firmly through the sieve. You can press/add more paste to the back of your piece until the strands are as long as you wish. Use a knife to scrape and lift off the ‘fluff’ carry it over to your ball of sugarpaste and use a dresden tool to help you position the fluff around the bobble. Repeat process until bobble is fully covered.
- (OPTIONAL) You can personalise your hats with various items from our other moulds such as Bows, Buttons, or knitted hearts from our Cable Knit Mould.
- Published in Blog
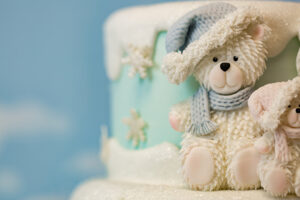
Tutorial – Cute Christmas Teddies
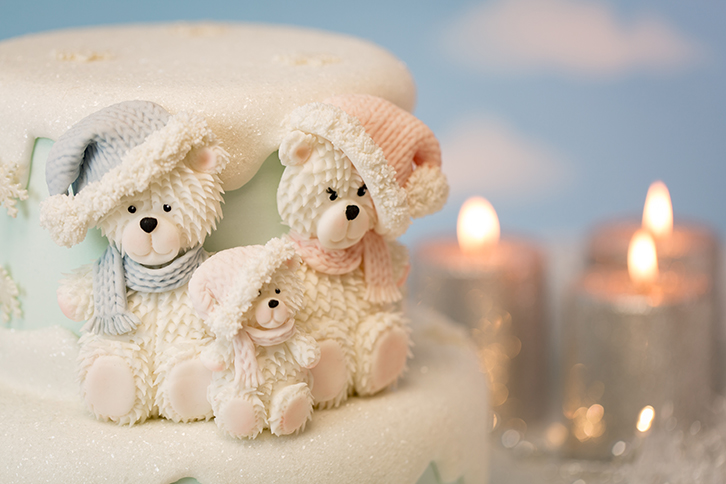
Cute Christmas Teddies
These cute little teddies are the perfect addition to any Christmas cake or why not make the teddy in biscuit dough and then dress in sugar paste?
Ideal for tree decorations, gifts, table places or if you just fancy a festive treat!
They can also be used for baby showers, birthdays and christenings.
Use our cookie recipes for perfect cookies that won’t spread!
Watch our quick tutorial video and then follow the instructions below!
For our favourite cookie recipes click here >>> ‘How to mould and bake perfect cookies’
Equipment
Karen Davies Large Teddy Mould
Karen Davies Knitted Piece Mould
And/Or Karen Davies Crochet Piece Mould
Karen Davies Sugarcraft Sugar Paste in Vanilla or Marshmallow
Cornflour
Small Rolling Pin
Rainbow Dust White, Black and Pink powder colour
Selection of small paintbrushes
Edible glue
Sieve
Cutting Wheel
Palette Knife
Dresden Tool
Instructions
- Dust your Large Teddy Mould with cornflour. Turn over and tap out any excess.
- Press sugarpaste firmly into your mould. Make sure your paste isn’t going over any edges and is flat at the back. Guide any excess over to one side with your fingers and tear away.
- Turn your mould over and peel back. Your teddy should drop out easily.
- Dust his feet, ears and cheeks with Pink powder colour.
- Mould a piece of paste in your Knitted Piece Mould. Turn over and peel back to release.
- Use a cutting wheel to cut a straight edge across your piece.
- Take a palette knife and carefully cut under each of his arms so as they can lift up away from his body.
- Place your knitted paste on top to fit like a jumper. Mark where you will need to cut the neck and sides.
- Use a cutting wheel to follow these guide lines and cut out the jumper.
- Attach to your bear using edible glue.
- You can now use any left over knitted paste to make sleeves. Make the first by placing the paste over an arm and marking where you need to trim. Trim the piece with a cutting wheel to create a sleeve. You can now use this as a template to create your second sleeve. Attach to the tops of the arms using edible glue.
- Glue the arms back down to the sides of the bear.
- Use a dresden tool to neaten any joins.
- Mould another piece of paste in your Knitted Piece Mould.
- Hold against the teddies head to mark where you need to trim to make a hat. You want to create a curved triangle shape.
- Attach on one side of the teddies head. Bend the edges of the hat underneath. You can create crease lines where the hat bends with your dresden tool.
- Mix Black powder colour with ispropyl alcohol and paint the eyes and nose. You can also add eyelashes if you wish.
- Your bear can be left plain or you can use small tweezer scissors to snip the paste to make the bear look fluffy. You do this by laying your scissors flat on the surface of the bear and snipping.
- You can add trims to the jumper by moulding the trim on the Knitted Piece Mould.
- Roll a ball of paste and attach to the end of the hat as a bobble. Roll a sausage of paste and attach around the bottom of the hat to create a trim. Brush both with edible glue.
- Push paste through a sieve. Make sure your fingers aren’t sticky by dusting them with a little cornflour. Press your paste through the sieve to create ‘fluff’.
- Use a palette knife to scrape the fluff away from the sieve and attach to the trim and bobble.
- Published in Blog
Tutorial – Quick & Easy Snowflake Cookies
Quick & Easy Snowflake Cookies
Impress your friends and family this Christmas with these super quick & easy snowflake cookies!
Ideal for tree decorations, gifts, table places or if you just fancy a festive treat!
Use our cookie recipes for perfect cookies that won’t spread!
Watch our quick tutorial video and then follow the instructions below!

For our favourite cookie recipes click here >>> ‘How to mould and bake perfect cookies’
Equipment
Karen Davies Sugar Snowflakes Mould
Cornflour
Lustre Dust – White, Silver or Gold
Dusting Brush
Water Spray Bottle
Dresden Tool and/or Ball Tool
Optional : Ribbon
Instructions
- Make your cookie dough following the instructions in our ‘How to mould and bake perfect cookies’ post.
- Dust your Sugar Snowflakes Mould with cornflour and tap out any excess. Roll your cookie dough into the mould.
- Turn your mould over and peel back. Your cookie dough should come out easily.
- Use a snowflake cookie cutter to cut individual cookies. You can just use one size of cookie cutter or you can use several to create different sized cookies.
- If making tree decorations now is the time to create a small hole at the top of each cookie using a dresden tool, ball tool or piping nozzle.
- Place your cookies on to a baking tray and bake.
- Once your snowflakes are baked, allow them to cool.
- When completely cool you can dust or paint your snowflakes with edible lustre dusts. Dust, White, Silver or Gold lustre straight on to your cookies or you can mix your dusts with isopropyl alcohol to paint individual snowflakes.
- Now you can spray your cookies with a light mist of water and sprinkle Magic Sparkles edible glitter on top.
- If creating tree decorations now you can finish by threading a piece of ribbon through the hole you created earlier and tying.
Snow is fallin’, all around me!
- Published in Blog
Tutorial – How To Decorate Winter Village Cookies
Winter Village Cookies
Keep cosy indoors this Christmas! Bake and decorate with our Winter Village Mould!
Create beautiful Nordic village inspired cakes and cookies.
For a plain biscuit recipe please see our ‘How to mould and bake perfect cookies’ post.
Click HERE for a video on how to mould.
Perfect Gingerbread Recipe
We often make cookies using our moulds. They are perfect for Christmas tree decorations, gifts and wedding favours. They are also delicious. So why not treat yourself this Halloween? The secret to creating perfect gingerbread houses is to use a dough that won’t spread..
75g light brown soft sugar
2 tablespoons golden syrup
1 tablespoon black treacle (this can be substituted for a tbsp. of golden syrup to make your gingerbread lighter)
1 tablespoon water
1 teaspoon ground cinnamon
1 rounded teaspoon ground ginger
A pinch of cloves
95g unsalted butter
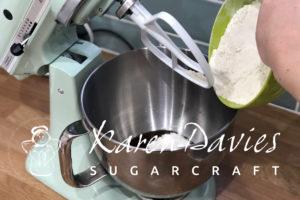
250g plain flour sifted, plus a little more (if needed).
Method
Put the sugar, syrup, (treacle), water, and spices together in a large saucepan.
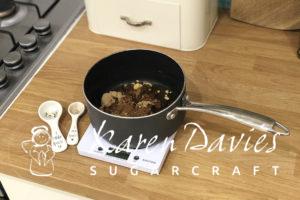
Bring them to boiling point, stirring all the time. Remove the pan from the heat and stir in the butter until melted.
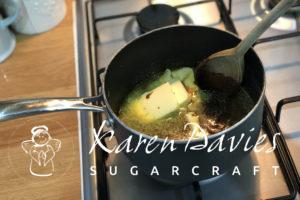
Next, stir in the flour gradually until you have a smooth dough – add a little more flour if you think it needs it. Knead your dough and then leave it covered in a cool place to become firm (approximately 30 minutes).
Pre-heat the oven to 180°C, gas mark 4.
If you’re not immediately making the cookies, wrap the dough in plastic wrap and refrigerate (or freeze) until you are ready to use it. Before using, bring to room temperature.
Now you are ready to mould and decorate!
Equipment
Gingerbread dough
Karen Davies Sugarcraft Winter Village Mould
Plain Flour or Corn Flour for dusting
Baking paper
White Royal icing
No. 1.5 piping nozzle
Piping bags
Royal Icing in flooding consistency – pink, ivory, blue, light brown, grey and any other pastel or festive colours you would like!
Small dish of water
Small flat paintbrush
Cocktail sticks
Instructions
Dust your Winter Village Mould with Plain Flour or Corn Flour and tap out any excess.
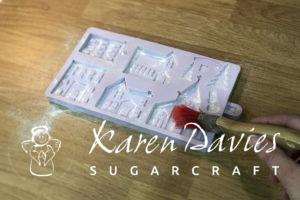
Take some of your cookie dough and roll into a smooth ball. Press the smoothest side down into one of the buildings. Use your fingers to push the dough into the mould until it is flat on the back and up to all of the buildings edges. Use your thumb to tear away any excess.
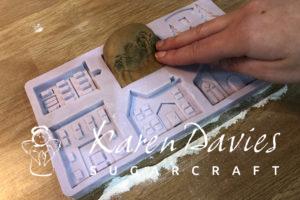
Turn your mould over and slowly peel the mould back until you can see the building start to fall out. Keep pulling back slowly so as not to tear any windows until your building has dropped out.
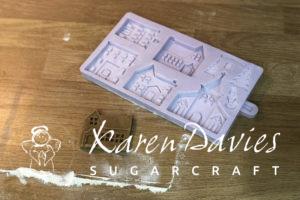
Mould as many buildings as your dough will make. Place on a baking tray lined with baking paper (you may have to bake in batches). Bake for approx. 10 – 15 minutes.
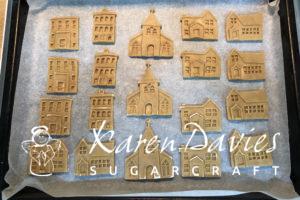
Once baked leave them to cool on the baking sheet for a few minutes before transferring them to a wire cooling rack.
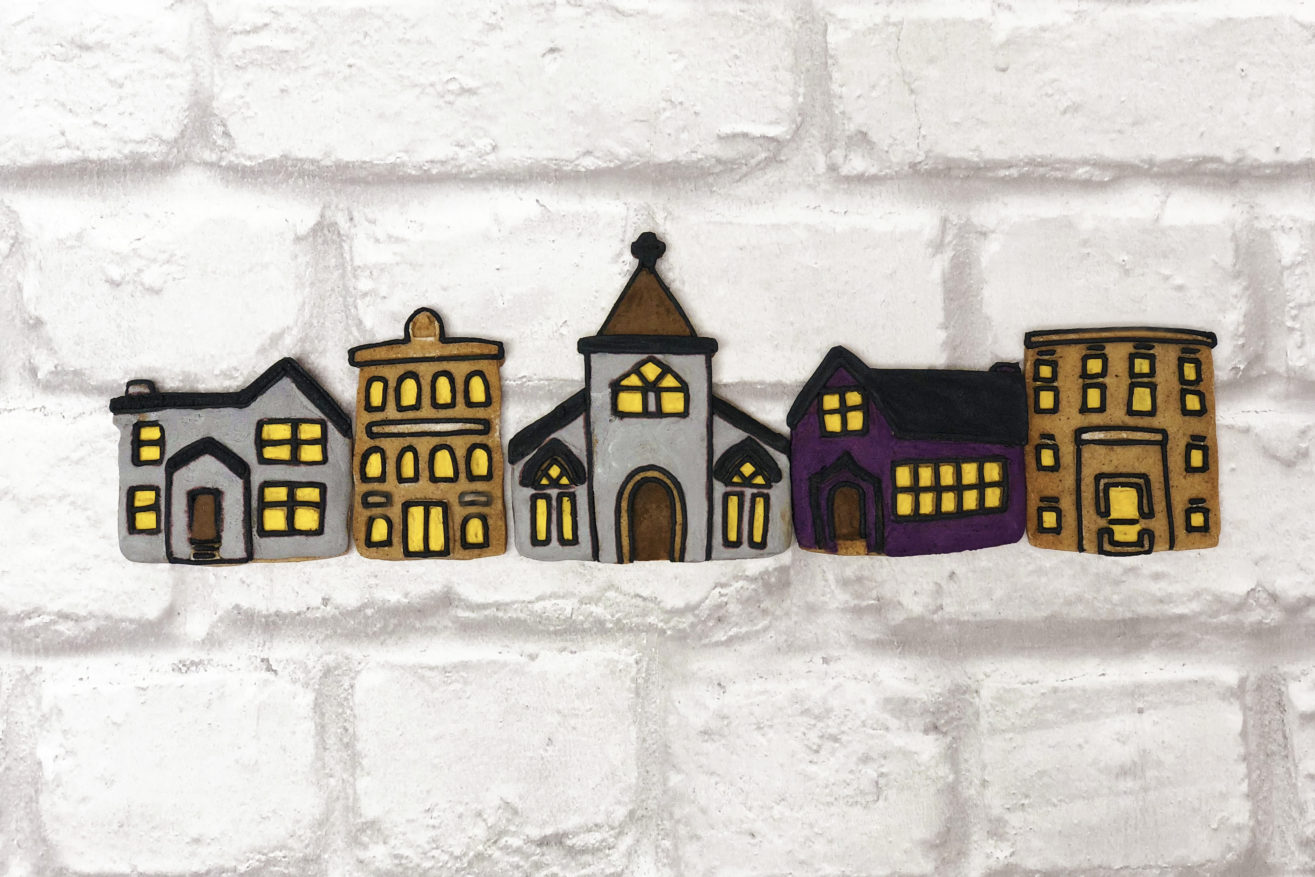
Once your cookies have cooled you can pipe over their details using a no. 1.5 piping nozzle and White Royal Icing. Pipe lines along their rooves, doors, window frames and any other detail. Allow to dry.
Once dry, use small amounts of food colouring to colour different shades of royal icing. Pastel colours look beautiful when all placed together but more festive colours could also be used. You can make as many different ones as you like! Turn your royal icing to a flooding consistency by gradually adding small amount of water and mixing.
Put each icing colour into piping bags and cut a small opening at the end. Flood each building in a main colour. Use a cocktail stick or small slightly damp brush to help guide your icing all the way up to the edges of the windows, doors and edges.
Flood the rooves in a different colour. Any other leftover details such as door frames can be flooded in various colours to make them stand out. Allow all of your buildings to dry.
Once your buildings have dried, use normal consistency royal icing to pipe any extra decoration such as dots, lines and snow on your buildings.
Ready, set, bake!
- Published in Blog
Tutorial – Reindeer
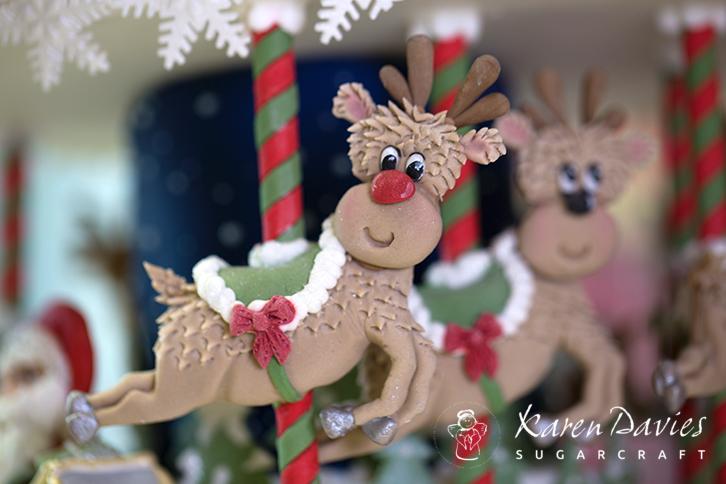
How To Make A Reindeer
Dasher, Dancer, Prancer or Vixen?
Comet, Cupid, Donner, Blitzen orrrrr Rudolph?
Make cute reindeer quickly and easily this Christmas using our Reindeer Heads Mould and Horse Mould!
Watch our quick tutorial video and then follow the instructions below!

Equipment
Karen Davies Sugarcraft Reindeer Heads Mould
Karen Davies Sugarcraft Horse Mould
Karen Davies Sugarcraft Sitting Reindeer Mould (optional)
Corn Flour
Brown Food Colouring
Green Food Colouring
Rainbow Dust Cherry Pie Powder Colour
Rainbow Dust Chocolate Powder Colour
Rainbow Dust Black Magic Powder Colour
Rainbow Dust Snow Drift Powder Colour
Rainbow Dust Pink Candy Powder Colour
Rainbow Dust Metallic Light Silver Powder Colour
A selection of paintbrushes
Edible Glue
Palette Knife
Instructions
- Colour some sugarpaste dark Brown and some light Brown.
- Dust your Reindeer Head Mould with cornflour and tap out any excess. Roll four small sausages of dark Brown paste and press firmly into the largest antlers on your mould. Turn the mould over and peel back. The antlers should drop out easily. Set to one side.
- Dust the largest head on your Reindeer Head Mould with Corn Flour and tap out any excess. Roll a ball of light Brown paste and press firmly into the reindeer head. Guide any excess over to one side using your fingers and tear away with your thumb. Turn your mould over and release the head.
- Use a dusting brush to lightly dust the ears and cheeks with Pink Candy powder colour.
- Mix isopropyl alcohol with White powder colour to turn it into a paint. Paint the eyes in White.
- Paint the pupils in Black. We always paint our eyes either looking to the side or up or down.
- Use a thin brush to paint a thin line above each eye. You can also draw eyelashes if you wish.
- Finish painting the eyes by adding a small white dot to each.
- Paint the nose in either Red or Brown depending on whether you are making Rudolph or not.
- Use small tweezer scissors to snip the top half of the reindeer’s face.
- Colour some sugarpaste Green and press into the seat of the saddle on the Horse Mould. Brush a small dot of water or edible glue onto the back of the saddle. Roll a thin sausage of paste and press into the strap of the saddle, press up until it meets and attaches to the seat.
- Roll a fat sausage of pale brown paste and press firmly into the mould on top of the saddle you’ve just filled. Push your paste along the body into the legs and hooves. Don’t worry about moulding the head or tail of the horse.
- Turn your mould over and peel back to release your paste. Use a palette knife to remove any excess at the neck of the horse, leaving a pointed piece. Gently flatten the point, leaving yourself an area to attach the reindeer head.
- Use your tweezer scissors to snip fur on to the body.
- Roll a small cone of light Brown sugarpaste and attach as a tail. Also snip this with the tweezer scissors.
- Attach the reindeer head onto the body and then attach the antlers into position.
- Use Silver powder colour mixed with isopropyl alcohol to paint the hooves.
- (OPTIONAL) Use our Sitting Reindeer Mould or any of our other moulds to mould an accessory for the saddle such as holly, ivy, mistletoe or bows.
Then one foggy Christmas Eve,
Santa came to say..
- Published in Blog
Tutorial – Haunted House Cookies
Haunted House Cookies
Trick or Treat? Make ghoulish gingerbread houses this Halloween with our Winter Village Mould!
For a plain biscuit recipe please see our ‘How to mould and bake perfect cookies’ post.
Perfect Gingerbread Recipe
We often make cookies using our moulds. They are perfect for Christmas tree decorations, gifts and wedding favours. They are also delicious. So why not treat yourself this Halloween? The secret to creating perfect gingerbread houses is to use a dough that won’t spread..
75g light brown soft sugar
2 tablespoons golden syrup
1 tablespoon black treacle (this can be substituted for a tbsp. of golden syrup to make your gingerbread lighter)
1 tablespoon water
1 teaspoon ground cinnamon
1 rounded teaspoon ground ginger
A pinch of cloves
95g unsalted butter
250g plain flour sifted, plus a little more (if needed).
Method
Put the sugar, syrup, (treacle), water, and spices together in a large saucepan.
Bring them to boiling point, stirring all the time. Remove the pan from the heat and stir in the butter until melted.
Next, stir in the flour gradually until you have a smooth dough – add a little more flour if you think it needs it. Knead your dough and then leave it covered in a cool place to become firm (approximately 30 minutes).
Pre-heat the oven to 180°C, gas mark 4.
If you’re not immediately making the cookies, wrap the dough in plastic wrap and refrigerate (or freeze) until you are ready to use it. Before using, bring to room temperature.
Now you are ready to mould and decorate!
Equipment
Gingerbread dough
Karen Davies Sugarcraft Winter Village Mould
Plain Flour or Corn Flour for dusting
Baking paper
White Royal icing
Black Royal Icing
No. 1.5 piping nozzle
Piping bags
Royal Icing in flooding consistency – purple, orange, yellow, dark brown, grey and any other Halloween colours you would like!
Small dish of water
Small flat paintbrush
Cocktail sticks
Instructions
Dust your Winter Village Mould with Plain Flour or Corn Flour and tap out any excess.
Take some of your cookie dough and roll into a smooth ball. Press the smoothest side down into one of the buildings. Use your fingers to push the dough into the mould until it is flat on the back and up to all of the buildings edges. Use your thumb to tear away any excess.
Turn your mould over and slowly peel the mould back until you can see the building start to fall out. Keep pulling back slowly so as not to tear any windows until your building has dropped out.
Mould as many buildings as your dough will make. Place on a baking tray lined with baking paper (you may have to bake in batches). Bake for approx. 10 – 15 minutes.
Once baked leave them to cool on the baking sheet for a few minutes before transferring them to a wire cooling rack.
Once your cookies have cooled you can pipe over their details using a no. 1.5 piping nozzle and Black or White Royal Icing. Pipe lines along their rooves, doors, window frames and any other detail. Allow to dry.
Once dry, use small amounts of food colouring to colour different shades of royal icing. Typical Halloween colours are purple, orange, green, grey, yellow and black. You can make as many different ones as you like! Turn your royal icing to a flooding consistency by gradually adding small amount of water and mixing.
Put each icing colour into piping bags and cut a small opening at the end. Flood each building in a main colour. Use a cocktail stick or small slightly damp brush to help guide your icing all the way up to the edges of the windows, doors and edges.
Flood the rooves in a different colour. Any other leftover details such as door frames can be flooded in various colours to make them stand out. Allow all of your buildings to dry.
Once your buildings have dried, use normal consistency royal icing to pipe ghosts, bats and pumpkins on your buildings.
Happy Halloween!
- Published in Blog
- 1
- 2