Liverpool Sugarcraft Club
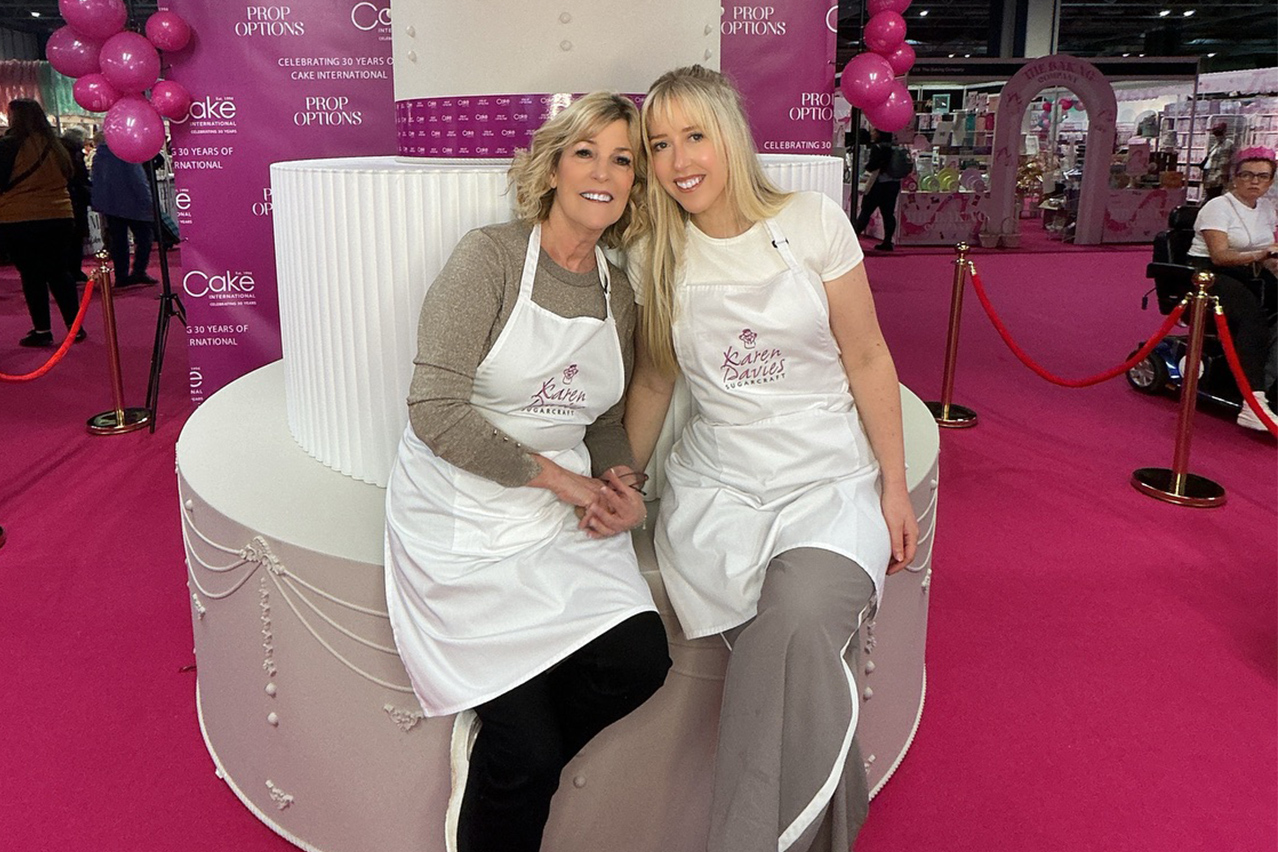
Demonstration evening with Karen & Alice 14.05.2025
- Published in Events
The Cake Decorating and Sugarcraft Show
Aldridge, Walsall WS9 8AN
- Published in Events
Blackpool Sugarcraft Guild
- Published in Events
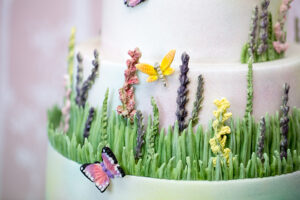
Tutorial – Wild Meadow Wedding Cake
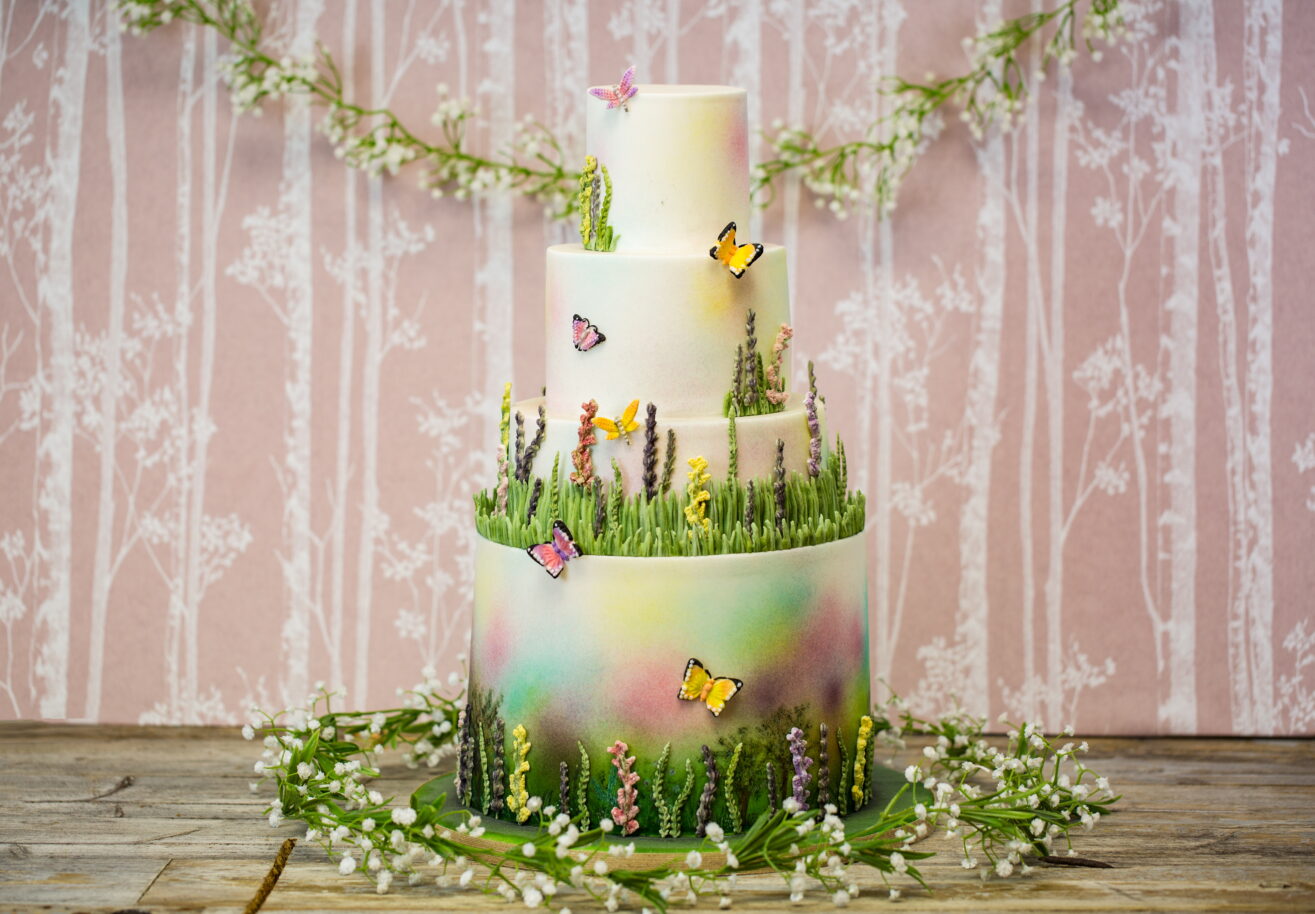
Wild Meadow Wedding Cake
Alice Kayley – Karen Davies Sugarcraft
A cake that oozes the sense of Spring/Summer days. Botanical and bright, the perfect centerpiece for any wedding or celebration
Equipment
2 x 10” round cakes 4” deep
8” cake 3” deep
6” cake 4” deep
4” cake 4” deep
14” cake drum
8”, 6” and 4” cake cards
1kg Karen Davies sugarpaste or a modelling paste
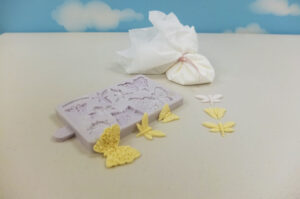
Karen Davies Wild Meadow mould
Karen Davies Brush Embroidery Butterflies mould or Butterfly & insect mould
Dresden tool
Isopropyl alcohol
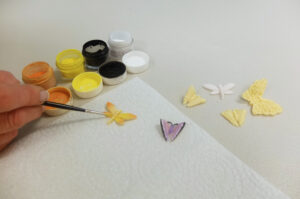
Paintbrushes and dusting brushes
Airbrush and colours (optional – powder colours and brushes can be used), green, pink, blue, purple
Powder colours, dark green, brown, lavender, yellow, pink, blue, black, white, orange, silver.
Sugarflair Spruce green paste colour
Cornflour dusting pouch
Angled palette knife
Instructions
Cake Preparation
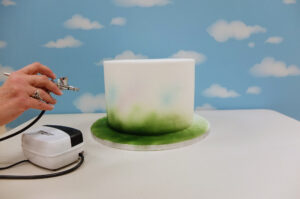
Stack the 10” cakes. Place the cakes on board and cards. Cover all cakes with sugarpaste. Dowel the cakes and trim level with each cake top. Roll out a long strip of sugarpaste and use to cover the edge of the cake board.
Use the airbrush to colour the cake and board. Build the green colour up gradually from the board and up the cake. Fade the green on the side of the cake. Add a little blue, pink and lilac further up the side of the bottom tier and to each of the other tiers.
If you do not have an airbrush – mix isopropyl alcohol with powder green colour. Paint the board dark green and the lower edge of the cake. Fade the colour out against the cake – do not have a sharp finish line. Brush powder colours into the dusting brushes on kitchen paper so there is no loose powder. Add patches of colour to every cake.
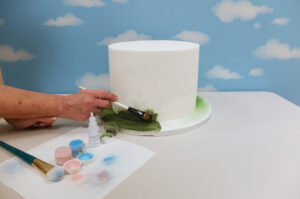
Mix brown powder colour with isopropyl alcohol and paint trees.
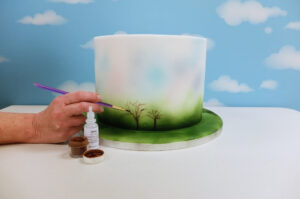
Paint leaves by just ‘dotting’ on the colour randomly over branches. Start with dark green, then a lighter green and finally a small touch of colour. 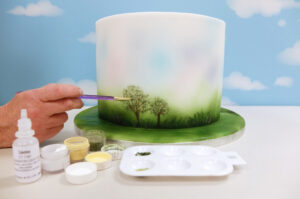
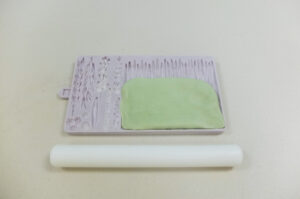
Colour some KD sugarpaste or a modeling paste green. Dust the wild meadow mould with cornflour. Mould the fern leaves and flower stems in green and white paste.
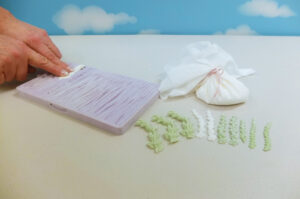
Curve slightly and leave to dry.
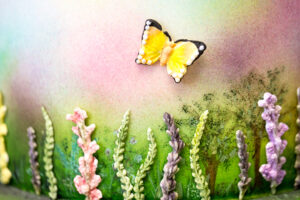
Brush powder colour onto leaves and flowers for a soft effect. Paint flowers for stronger colour. Small white highlights can be painted on also.
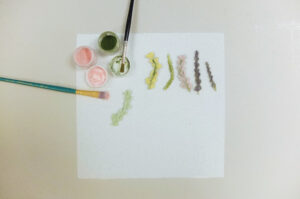
Mould butterflies and dragonflies in white and yellow paste. Allow some to dry flat on your work surface and others to dry folded against the mould.
Brush powder colours on to the butterlies and dragonflies for soft shading. Paint for the stronger colouring.
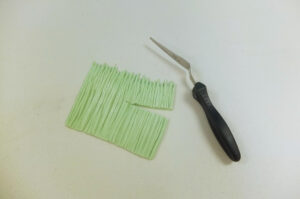
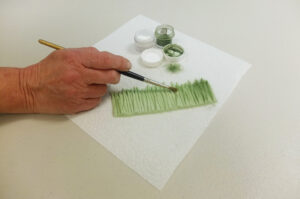
Dust the wild meadow mould with cornflour. Roll the green paste out a little before placing on to the grass so it is not too thick. Roll from the bottom of the grass to the top. Trim the excess paste at the top of the mould with an angled palette knife, your thumb, or remove from the mould and use scissors.
Trim the grass to approximately 1.5inches.
Brush powder green colour between the blades of grass then a little across the top. A touch of white can be added to highlight.
Repeat the moulded grass pieces trimming to approximately half an inch.

Colour royal icing green and place in a piping bag. Use the royal icing to attach the taller grass to the side of the 8inch tier and the short grass to the top edge of the 10inch. Add flowers and leaves.
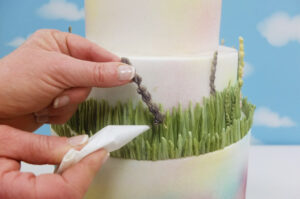
Attach flowers around the bottom tier.
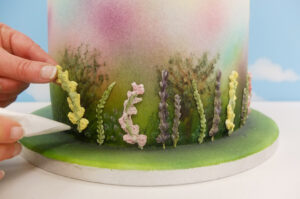
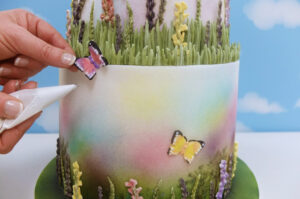
Attach the butterflies and dragonflies at random working their way up the cake. Small groups of flowers and grass can be added to the top two tiers.
- Published in Blog
Silicone Mould Masterclass

- Material: Ensure your silicone mould is made from food-grade silicone for edible creations or high-quality silicone for crafting projects. Be careful where you purchase moulds from as there are many counterfeit moulds out there which use inferior quality silicone that may not be food safe, will rip or tear and do not have the release quality required to give you optimum results.
- Design: Select a mould that complements your project. Moulds come in various shapes and sizes, from intricate patterns to detailed figures.
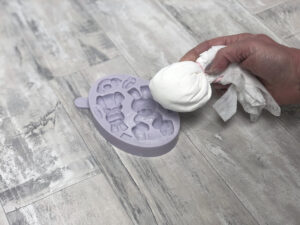
2. Preparing the Mould:
- Cleaning: Wash the silicone mould with mild soap and water before the first use. Our silicone moulds are dishwasher friendly too! (Not moulds on the market are).
- Dust with Cornflour: ALWAYS dust your mould with cornflour. Use a cornflour pouch and pat it all over the mould. Tap out any excess before moulding. Do not use trex (white vegetable fat). The reason is that when you release the paste from the mould, you might want to add colours by brushing on or painting with powders. The grease will prevent you from doing this.
- Have tylose (cmc) powder to hand: Tylose(cmc) powder can be added to your sugarpaste / fondant to ensure that it will work with the moulds. The general rule is approximately 1 tsp of tylo kneaded into 250g of sugarpaste. The quantity can vary slightly depending on the brand of paste that you use. You need to bear in mind that the paste will also firm up further the few hours after the tylo is kneaded into it. Karen Davies Sugarcraft own brand sugarpaste works straight from the packet with no need to add tylo.
3. Using the Mould:
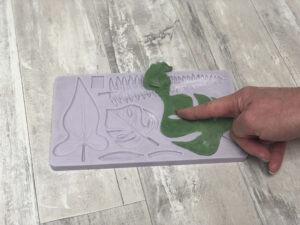
- Materials: Prepare your chosen material (chocolate, fondant, resin, etc.) according to the product instructions.
- Filling the Mould: Pour or press the material into the mould carefully, making sure to reach all the details. Make sure you fill the cavity so as your material is flat against the back of the mould.
- Leveling: Scrape excess material from the top of the mould using your fingers if using sugarpaste/ cookie dough/ clay or a spatula or knife if using a liquid substance to create a smooth surface.
- Make sure your fingers aren’t sticky: When moulding a thin piece of sugarpaste, you should also dust the back of the paste with cornflour to prevent it sticking to your fingers and lifting out of the mould too soon.
4. Setting or Baking:
- Setting Time: Sugarpaste and certain clays can be released immediately. Simply turn your mould over and peel back. Chocolate and other liquid materials will need to be left to set. Cookie dough should be released onto a lined baking tray ready for baking.
- Baking: If using for baking, follow the recommended temperature and time guidelines, such as our no-spread cookie recipe.
5. Releasing:
- Waiting Period: Ensure your creation has fully set or cooled before attempting to demould. Sugarpaste, rolled buttercream, certain clays and cookie dough can be released immediately.
- Peeling Away: Gently peel back the edges of the mould to release your creation. Flex the mould to help release the edges if necessary.
6. Cleaning and Storage:
- Cleaning Up: Wash the mould with mild soap and water. Some silicone moulds are dishwasher safe (including ours.. yippee!)
- Storage: Store the mould in a cool, dry place.
7. Tips for Success:
- Temperature Awareness: Be mindful of temperature requirements for both the material and the mould. In warmer weather
- Experiment: Don’t hesitate to experiment with colors, layers, and techniques to enhance your creations.
- Patience: Allow ample time for setting or cooling if using a liquid material to avoid damaging your masterpiece during release.
8. Advanced Techniques:
- Layering: Create multi-layered designs by building colours! When using sugarpaste use a small bone tool or ball tool to help you press different coloured pastes into different crevices.
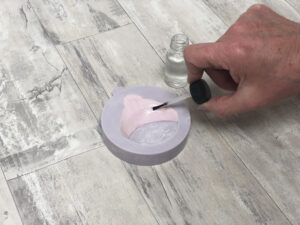
- Painting/Decorating: After releasing, enhance your creations with additional colors or decorations. We always use edible powder colours to dust our creations and we add rejuvenator spirit to turn our powders into paints when a stronger colour is needed.

9. Safety:
- Material Safety: If using for food, ensure that the silicone mould is food-grade and has no harmful additives. Counterfeits like those on Amazon, Shein, Alibaba and Temu are more than often not food safe. If the mould seems like an absolute bargain.. there’s a reason for it. Poor quality silicone can also rip or tear.
- Ventilation: For projects involving fumes (e.g., resin casting), work in a well-ventilated area.
Remember to always follow the specific instructions provided by the manufacturer of your silicone mould and the material you are using. Happy creating!
- Published in Blog, Uncategorized
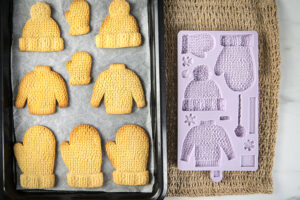
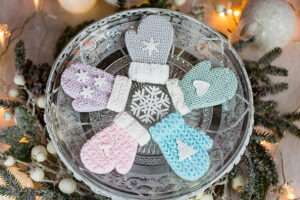
Tutorial – Winter Mitten Cookies
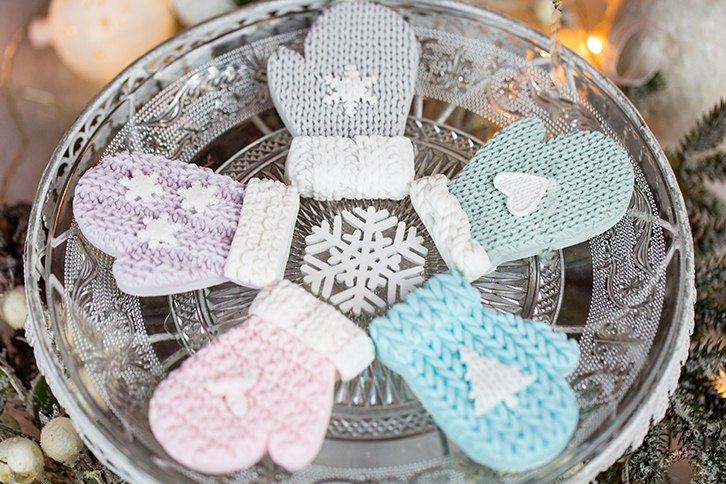
Winter Mitten Cookies
Keep your cakes and bakes warm this Winter with this fun winter mitten tutorial.
Make mittens using our cookie recipes and our range of knit and crochet moulds!
Watch our quick tutorial video and then follow the instructions below!
For our favourite cookie recipes click here >>> ‘How to mould and bake perfect cookies’
Equipment
Either..
Karen Davies Sugarcraft Chunky Rib Mould
Karen Davies Sugarcraft Knitted Piece Mould
Karen Davies Sugarcraft Crochet Piece Mould
Karen Davies Sugarcraft Chunky Knit Mould
And/Or..
Karen Davies Sugarcraft Rustic Cable Knit Mould
Corn Flour
Edible Glue
Various cutters such as Holly and Trees could also be used.
Instructions
- Make your cookie dough following the instructions in our ‘How to mould and bake perfect cookies’ post.
- Roll out your cookie dough until it’s 1cm thick and use your mitten cutter to cut out as many mittens as you would like.
- Place on a baking tray and bake.
- Once your mittens are baked, allow them to cool. You can either wait until your cookies are completely cool and then follow the steps below, attaching your decorations to your cookie as you go. Or you can create the decorations in advance and then simply attach on top of your cookies once the cookies have cooled.
- Colour your sugarpaste using food colouring. They look beautiful in either pastel or festive colours. We always use either Rainbow Dust or Sugar Flair food colouring.
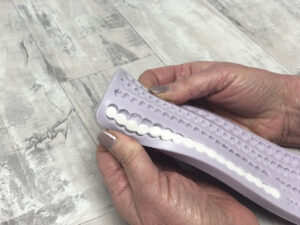
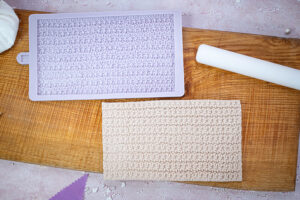
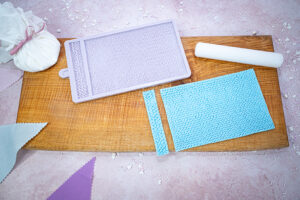
- Start by dusting your knit/crochet effect mould with cornflour and tapping out any excess.
- Roughly roll out your sugarpaste on your work surface before placing into your mould. Start by using your fingers to press and secure your paste into one edge of the mould. Take a rolling pin and begin to roll from the edge that you have just secured. Roll firmly into the mould until you can begin to see the pattern through the back of your sugarpaste.
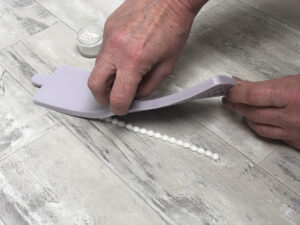
- Tear away any excess either with your fingers or with a palette knife before turning your mould over and peeling back. Your sugarpaste should drop out easily.
- Use your mitten cookie cutter to cut out a mitten from your moulded sugarpaste. To create a pair, simply turn your paste over so as the plain side is facing up and cut. Before cutting – make sure that the knitted pattern is running in the correct way – down or across your mitten. Place to one side.
- Now you can mould accessories for your hat using various cutters such as holly and trees or you can mould accessories from our moulds such as Rustic Cable Knit Mould, Sugar Snowflakes Mould, Baby Buttons Mould, Buttons Mould, Flower Buttons Mould.
- Mould a trim for your mittens using one of our various knit/crochet effect moulds. In the video above we have used the trim from our Knitted Piece Mould. Measure it against the cuff of your mitten before trimming to size with a cutting wheel and attaching with edible glue. You can also make trims using any of the other moulds in our knit & crochet range.
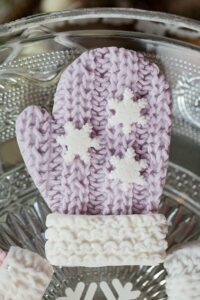
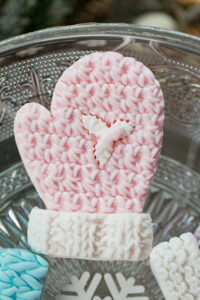
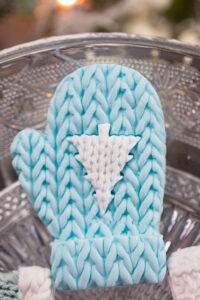
Let it snow, let it snow, let it snow!
- Published in Blog
Tutorial – Bunny bottom Easter cookies
These cute bunny bottom cookies make perfect Easter treats. Give as gifts or make with the kids this Easter! Can also be used as decorations on cupcakes and cakes.
Equipment
Karen Davies Sugarcraft Wild Meadow Mould
Karen Davies Sugarcraft Easter Bunny Mould
Small Rolling Pin
Palette Knife
Edibles
44m square cookies baked using our cookie recipe >> see here <<
Icing Sugar
Apricot Jam
Cornflour
Sugar Flair Spruce Green food colouring
Rainbow Dust Chestnut food colouring
Rainbow Dust Tangerine food colouring
Rainbow Dust powder colours – Autumn Green, Pumpkin Pie, Snow Drift, Pink Candy.
Edible Glue
1. First you will need to bake some delicious cookies using our cookie recipe! See the recipe here!
Make your dough, roll it out on to your work surface and cut cookies using a 44mm square cookie cutter. Place on a lined baking tray and bake!
2. Allow your cookies to cool on a cooling rack.
3. Colour some Karen Davies Sugarpaste pale green using Sugar Flair Spruce Green food colouring. Dust your work surface with icing sugar and roll your sugarpaste out thinly on your work surface. Use your cookie cutter to cut enough squares to cover all of your cookies.
4. Once your cookies have fully cooled, spread a thin layer of apricot jam on the top surface and attach a green square on each.
5. Colour some paste a darker Green colour using the Spruce Green food colouring.
6. Dust your Wild Meadow Mould with cornflour and tap out any excess.
7. Roll a sausage of paste wide enough to fill the top quarter of the grass on the mould and long enough to fill the width. Place on top of your mould a quarter of the way down from the top of the grass.
8. Use your fingers to press the bottom edge of your paste into the mould. This will help hold your paste in place whilst you roll the rest up to the top of the grass.
9. Use a small rolling pin to roll your paste up the top of the grass. You may need to dust the back of your paste with cornflour to stop it from sticking to your rolling pin.
10. Make sure your paste is rolled thinly and flat against the mould. Carefully cut away any excess using a palette knife. If you cut over the top of the grass you will see that your paste will remain in the grass strands and any excess will come away.
11. Turn your mould over and peel back to release your grass. You can now dust it with Autumn Green Powder colour.
12. Cut your grass into thirds. This will give you enough grass for three cookies. Repeat steps 7-11 until you have enough grass for all of your cookies.
13. Take a strip of moulded grass and bend it into a circle shape so that both ends meet. Attach the ends together with edible glue.
14. Attach the circles of grass to the centre of each cookie using edible glue. Don’t worry if there is a hole in the middle as your bunny bottom will hide it!
15. Colour different shades of pale Brown sugarpaste using Chestnut Brown food colouring.
16. Dust your Easter Bunny Mould with cornflour and tap out any excess.
17. Roll a small ball of sugarpaste and firmly press into the bunny bottom on your mould. Guide any excess paste to one edge and tear off with your thumb. Make sure your paste is flat at the back before turning your mould over peeling back to release.
18. Dust the pads on the bunnies feet using Rose powder colour.
19. Dust the tails with White powder colour.
20. Attach your bunny bottoms on top of the grass on your cookies using edible glue.
21. Colour some sugarpaste using Tangerine food colouring. Mould carrots from the Easter Bunny Mould. Dust the leaves with Autumn Green powder colour and the carrots with Pumpkin Pie powder colour before attaching to your cookies.
- Published in Blog
Tutorial – Bobble Hat Cookies
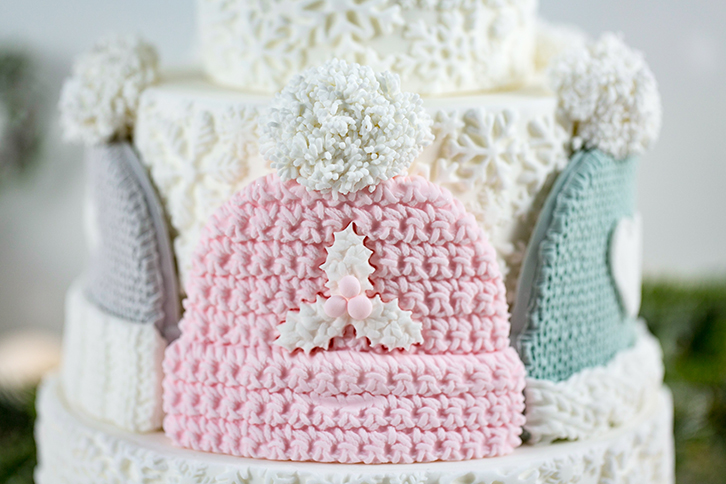
Bobble Hat Cookies
Keep your cakes and bakes warm this Winter with this fun bobble hat tutorial.
Make cute bobble hats using our cookie recipes and our range of knit and crochet moulds!
Watch our quick tutorial video and then follow the instructions below!

For our favourite cookie recipes click here >>> ‘How to mould and bake perfect cookies’
Equipment
Either..
Karen Davies Sugarcraft Chunky Rib Mould
Karen Davies Sugarcraft Knitted Piece Mould
Karen Davies Sugarcraft Crochet Piece Mould
Karen Davies Sugarcraft Chunky Knit Mould
And/Or..
Karen Davies Sugarcraft Rustic Cable Knit Mould
Corn Flour
Edible Glue
Sieve
Cutting Wheel or Pizza Wheel
Palette Knife
Instructions
- Make your cookie dough following the instructions in our ‘How to mould and bake perfect cookies’ post.
- Roll out your cookie dough until it’s 1cm thick and use your bobble hat cutter to cut out as many hats as you would like.
- Place on a baking tray and bake.
- Once your hats are baked, allow them to cool. You can either wait until your cookies are completely cool and then follow the steps below, attaching your decorations to your cookie as you go. Or you can create the decorations in advance and then simply attach on top of your cookies once the cookies have cooled.
- Colour your sugarpaste using food colouring. They look beautiful in either pastel or festive colours. We always use either Rainbow Dust or Sugar Flair food colouring.
- Start by dusting your knit/crochet effect mould with cornflour and tapping out any excess.
- Roughly roll out your sugarpaste on your work surface before placing into your mould. Start by using your fingers to press and secure your paste into one edge of the mould. Take a rolling pin and begin to roll from the edge that you have just secured. Roll firmly into the mould until you can begin to see the pattern through the back of your sugarpaste.
- Tear away any excess either with your fingers or with a palette knife before turning your mould over and peeling back. Your sugarpaste should drop out easily.
- Use your bobble hat cookie cutter to cut out a hat from your moulded sugarpaste. Before cutting – make sure that the knitted pattern is running in the correct way – down or across your hat. Place to one side.
- Mould a trim for your hat using one of our various knit/crochet effect moulds. In the video above we have used our Rustic Cable Knit Mould. Measure it against the bottom of your hat before trimming to size with a cutting wheel and attaching with edible glue.
- Roll a small ball of sugarpaste and attach and gently flatten to the bobble on your hat. Lightly cover with edilble glue.
- Soften sugarpaste using Trex (white vegetable fat). Roll into balls and press through a sieve to create the fluffy bobble texture. Press through until it is the desired length. Use a palette knife to gently scrape the ‘fluff’ off and take over to your bobble. Attach to your bobble. Repeat the process 4-5 times until the bobble is covered.
- Now you can mould accessories for your hat from our various moulds such as Rustic Cable Knit Mould, Baby Buttons Mould, Buttons Mould, Flower Buttons Mould.
Oh, the weather outside is frightful!

- Published in Blog
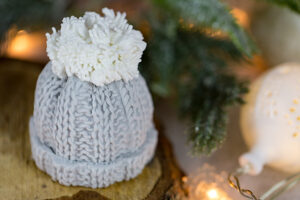
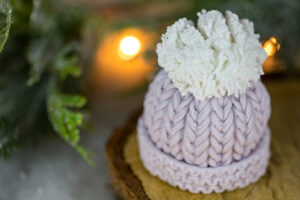
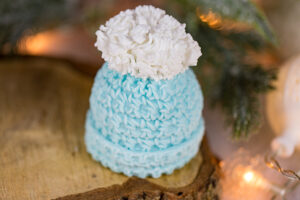
Tutorial – Mini Bobble Hat Cakes
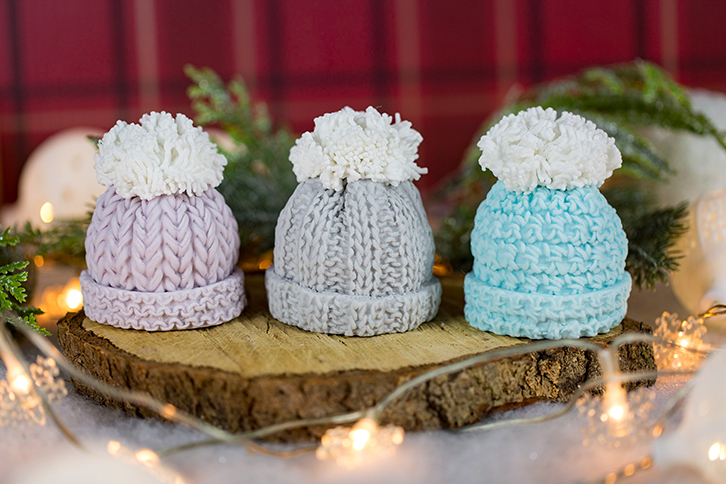
How To Make Mini Bobble Hat Cakes!
Keep your cakes and bakes warm this Winter with this fun bobble hat tutorial.
Make cute bobble hats using muffins or cupcakes and our range of knit and crochet moulds!
Watch our quick tutorial video and then follow the instructions below!
Equipment
Either..
Karen Davies Sugarcraft Chunky Rib Mould
Karen Davies Sugarcraft Knitted Piece Mould
Karen Davies Sugarcraft Crochet Piece Mould
And/Or..
Karen Davies Sugarcraft Chunky Knit Mould
Corn Flour
Blue, Grey, Lilac or Pink Food Colouring
Buttercream/Apricot/Chocolate
Sieve
Knife
Edible Glue
Instructions
- Colour some sugarpaste in your chosen colour.
- Take your muffin or cupcake and turn it upside down so as it’s widest point is at the bottom. Trim bottom flat if necessary. Crumb coat in buttercream (jam, chocolate etc can also be used if preffered).
- Dust which ever knit/crochet effect mould you have chosen with cornflour. Tap out any excess.
- Roll out your sugarpaste roughly on your work surface and then place on top of your mould. Use your fingers to secure the bottom edge and one side edge down into the mould before using a rolling pin to firmly roll your paste into the mould. You should start to be able to see the pattern through the back of your paste.
- Turn your mould over and peel back, your paste should peel easily out of the mould.
- If your paste looks like it’s going to be too big for your cake you can trim a little excess off. But there’s no need to be precise, you’d rather leave yourself with more to work with than too little!
- Wrap your paste around your cake and use your fingers to gently press and gather any excess together at the top. Use a sharp knife to carefully cut away any excess.
- Use a Dresden Tool to help disguise any joins. Don’t worry too much about the top as your bobble will cover it.
- Brush the top of your hat with edible glue and then roll a ball of white sugarpaste and attach on top.
- Brush around the base of your hat with edible glue and mould a trim from either the same mould or from another one of our knitted effect moulds. Trim to size before attaching using a knife or cutting wheel.
- Use a Dresden Tool to help push the paste around the top edge of your trim right up against your bobble hat so as there are no gaps showing.
- Brush the white ball on top of your hat with edible glue. Soften white sugarpaste with some Trex (white vegetable fat). Take a sieve and press a ball of sugarpaste firmly through the sieve. You can press/add more paste to the back of your piece until the strands are as long as you wish. Use a knife to scrape and lift off the ‘fluff’ carry it over to your ball of sugarpaste and use a dresden tool to help you position the fluff around the bobble. Repeat process until bobble is fully covered.
- (OPTIONAL) You can personalise your hats with various items from our other moulds such as Bows, Buttons, or knitted hearts from our Cable Knit Mould.
- Published in Blog
Rolled Buttercream Recipe
The game changer that is rolled buttercream (or butterpaste as we like to call it)!
We are loving making cakes and using our moulds with this beautiful recipe.
It’s so easy to use and tastes delicious, just like buttercream.
It’s more stable than normal buttercream and so you don’t have to stress so much about your decorations melting or sweating in warmer weather!
It dries with an outer crust but remains beautifully soft to eat on the inside. And it’s perfect for covering cakes with, no elephant skin!
We could go on and on about how much we love it but you just need to try it for yourself!!
Ingredients
- 125g unsalted butter
- 125ml corn syrup
- 500g icing sugar (plus 300g-500g for kneading)
Instructions
- Cream your butter for 10 minutes until pale and fluffy
- Slowly mix in your corn syrup
- Slowly add in 500g of icing sugar until a sticky dough is formed.
- Knead your buttercream into extra icing sugar on your work surface until a smooth ‘dough’ forms (this part is honestly so therapeutic, it’s beautifully smooth!)
- You will know that your buttercream is ready when it’s no longer sticky and is beautifully smooth and pliable
- Colour with food colouring (gel or oil based).
- If covering a cake with rolled buttercream, crumbcoat your cake first for your rolled buttercream to adhere to.
- To mould, simply dust your mould with cornflour and press your buttercream firmly in. Peel back to release. Attach to your cakes using normal buttercream or edible glue.
- Published in Recipes